Showing posts with label finished projects. Show all posts

Monday, September 23, 2013

Panda Bear

Oh my gosh, guys, guess what? I sewed something! Let's take a look back through the blog here and figure out when the last time that happened was. March! No promises that I'll be doing this too regularly. 


I used a Dolls and Daydreams pattern that I bought quite awhile ago, and although I've made this pattern four times now, this is the first time I've ever truly followed it. 


I made a punk/goth panda bear from it for my sister and it was so popular among her friends that I ended up making two more. This time, the panda's face is decidedly different and way more like Dolls and Daydreams original design. I have more plans for this bear. Hopefully, you'll see those soon. 

Wednesday, April 3, 2013

Easter Round Up

So Easter was three days ago, sue me! Or don't, really, you'd get a minivan in great need of a detailing and two sewing machines. I'm rich, y'all. 

Layout made with Bella Gypsy's Basket Case Bundle
If there was a theme to my holiday this year, it was probably Pinterest. I saw tons of cute eggs colored with Sharpies, so I bought a package of the new Bic permanent markers to try it myself (They were less than half the cost of Sharpies, and wrote really well, and they didn't smudge after being in the refrigerator or the damp grass...I might be a convert!) I also pinned a couple cute banners and tried my hand at making one from this printableIt turned out nice, but just like my baby shower banner, I made it way too large. Maybe I'l find a better place to hang it next year in the new house. 


I also bought a cheap grapevine wreath from Michael's and embellished it with a whole bunch of stashed craft items. I used the Bic markers for this project too. The little foam eggs were on bamboo skewers, and I colored them brown to blend in with the wreath before weaving them through. You can kind of see up close, but I was really unsure of what kind of adhesive to use on the Styrofoam, so for me, this was a much better option. 

Another bunny from the Pinterest printable
What do you think? I'm excited to have some decorations I can use year after year, and for less than $12 with all of the supplies I had on hand! 

Tuesday, March 12, 2013

Some Little Pillows & Some Big News

Let's just start this off by saying I am not pregnant. I think any time a married woman in her 30's has big news that's where we all jump to, but seriously...not me! I won't say never again, because the last time I was "done" having children God laughed at me and gave me Caroline less than a month after I made that decision. 


I made these little pillows from a clearance shower curtain I found at Target. Roughly four yards of adorable, kid friendly, stain resistant decorator weight cotton fabric for $9.98? Yes, please! 


I did a simple envelope back on the pillows so that they would be easy to take off and clean. It also really simplified my sewing as I was able to use the existing hem on the bottom of the shower curtain for the top part of the envelope. 

So, why am I making these cute little pillows (12 X 12 and 12 X 16)? We're moving! One of the things we were looking for in a new house was a playroom for the kids, and I'm happy to say that our new house allows for that. However, the layout of the house is such that the kids' playroom will be the first thing anyone sees when they come in our front door. Yuck! 

Trying to plan cute, functional decor for a kids' space that will make the first impression of my entire home? Um...hard! If anyone has any tips on that, I'm all ears! 

Tuesday, March 5, 2013

Modern Infinity Scarf

I mentioned yesterday that I had an infinity scarf on my sewing machine, and I finished up the hand stitching on it this morning. I love it. It is going to be hard to give this one away, really hard. 


I made this for my youngest sister's birthday using the "heart" part of my Infinity Scarf Tutorial. She is going to be 18 (and hopefully isn't a blog reader) and when I asked about what color she might wear I got, "I don't know, black?" I kind of wanted to bang my head into the wall. I mean seven black fabrics? I must have walked around my local quilt shop for a half hour at least! 

In the end I had two tone on tone black prints, a solid black, a solid gray, the dark gray (stone) Huevos, the ring dot and the single seriously bright print. I am so in love with that print, but also nervous that it will be the deciding factor in whether or not she wears this. I will be crossing my fingers and tossing this into a box, quickly, because I think if it sits here too much longer it will end up around my neck! 

Friday, February 22, 2013

Heart & Soul: Infinity Scarf Two Ways Tutorial

I really liked the patchwork on this infinity cowl on the Art Gallery Fabrics blog. It's gorgeous on the model, but I wanted something a little more wearable for me. Something thinner, and a lot longer so I could get that pretty, layered look by looping it twice. In the end, I made two different versions, a simple scarf from large fabric pieces, and a more complex one to use up those last tiny bits from my favorite fabrics (I almost called this the quilter's variation). 


To make the simpler Heart scarf (named because of the Love fabrics I have had stashed for over a year now), you will need 7 fat quarters. Cut two 9.5 X 12 inch rectangles from each fabric. Using a 1/4 inch seam allowance, sew the rectangles into two rows along the 12 inch side (scroll down to see a diagram of suggested fabric placement). 

To make the Soul version, we're going to utilize scraps (mine are scraps from my Soul Blossoms basket quilt I have got to finish). 

Cut: 

8- 9.5 X 12 rectangles (block A)
4- 5 X 12 rectangles (block B)

4- 4 X 9.5 rectangles (block C)
2- 5 X 9.5 rectangles (block C)

2- 4 X 7 rectangles (block D)
2- 3 X 4 rectangles (block D)
2- 7 X 8.5 rectangles (block D)
2- 3 X 8.5 rectangles (block D)


Assemble two of block C by sewing two 4 X 9.5 and one 5 X 9.5 inch strips together along the 9.5 inch sides (the order doesn't matter). 

Assemble two of block D by sewing the 4 X 7 inch rectangle to the 3 X 4 rectangle along the 4 inch side. Sew the 3 X 8.5 inch rectangle to the 7 X 8.5 inch rectangle along the 8.5 inch side to create the second half of the four patch unit. Sew these two sections together so that the top seams intersect. 

Now you're ready to sew your rows. Each row will have 4 of block A, 2 of block B, one of block C and one of block D. Make 2.
Diagram for suggested fabric and block placement

Finishing instructions:

Place your two rows face down on top of each other (right sides together). Sew along both of the long sides with a 1/4 inch seam. Now, comes the weird part, but trust me, it works out in the end! Open up your scarf on one short end, reach inside, and grab the opposite end with your hand. Pull it up through the inside so that it's flush (1) with the end you started at. At this point, it should look like a windsock (2), not a scarf. Be careful not to twist it, or you will end up with a weird seam! 


Take the front off of your sewing machine and place your scarf around it (3). Sew almost completely around the outside edge, leaving about a six inch gap. Pull your scarf right side out through the gap and hand sew closed. That's it! 


You're now ready for the putting it on and looking instantly pulled together part, at least if you're not like me and in desperate need of a haircut. 


Let me know if you make one or both of these, I'd love to see them! I'm thinking I have to put more together for a few spring birthdays I know. 

Friday, December 21, 2012

Christmas Stockings

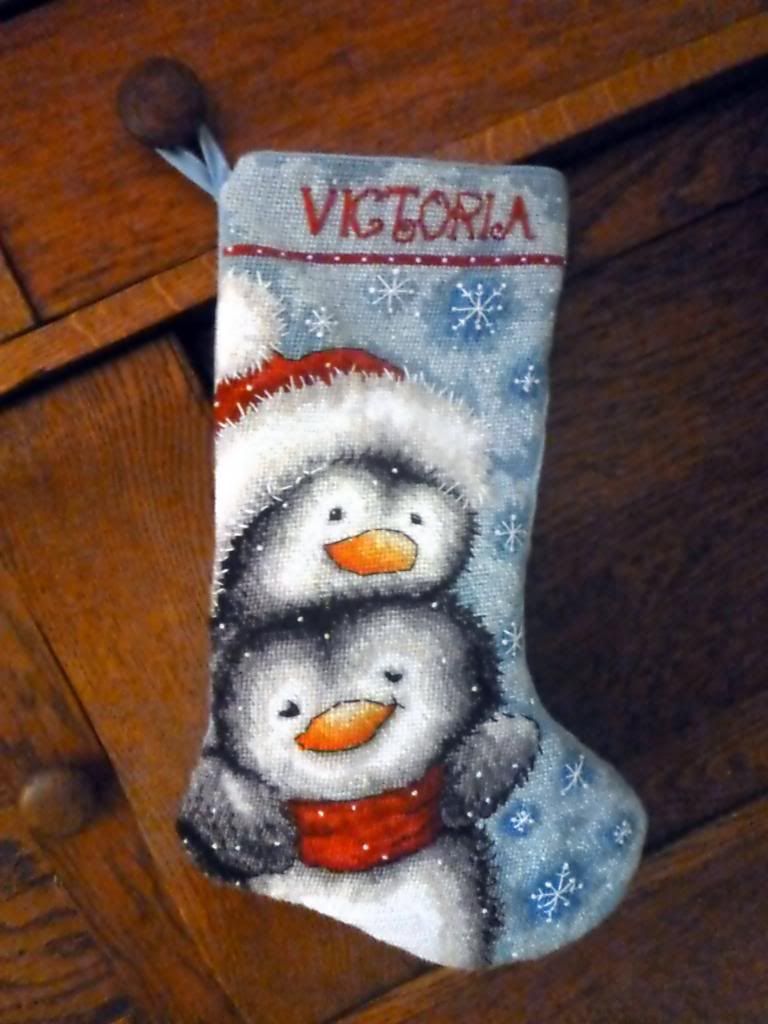
If you've been around my blog for awhile, then you may remember my first stocking. It was a needlepoint kit I made for my step-daughter. I finished it up last year, just before Christmas, even though I had a newborn (but it really helped that it was 90% done from the year before).


P1000477_zpsee7d46a3

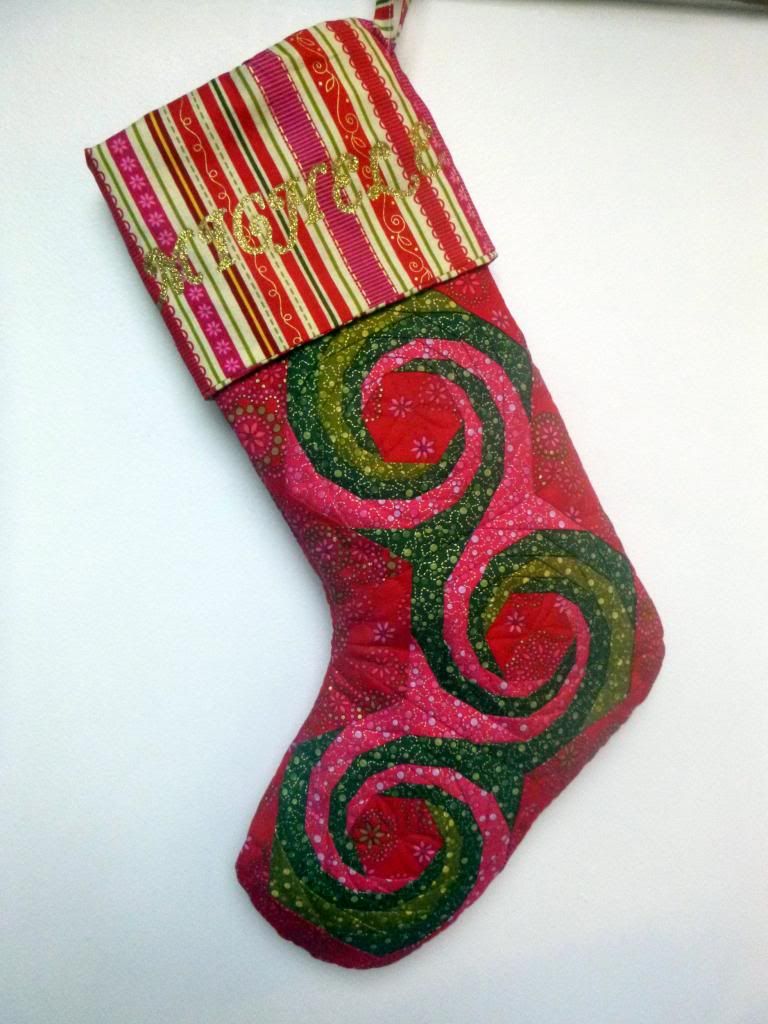
I bring up that stocking because Quilting Lines is hosting a Christmas Stocking Hang Out and because I made another one! No needlepoint this time..I might have been serious when I said never again! 


P1000478_zps11d2a7e6

A couple years ago, my mother-in-law ordered a kit for this paper pieced stocking from a magazine..only, she had no idea how to paper piece. She tried, but this pattern is not anywhere one should start out piecing! 

Some time later she sent it to me, at a point when I also had no idea how to make it. I put it in a drawer, but it has been in the back of my mind, especially since I learned how to paper piece this year. I decided to pull it out and make it for her this Christmas. I knew she would love it, as she bought it for herself, and I thought it would mean more to her than one to match the rest of ours. 


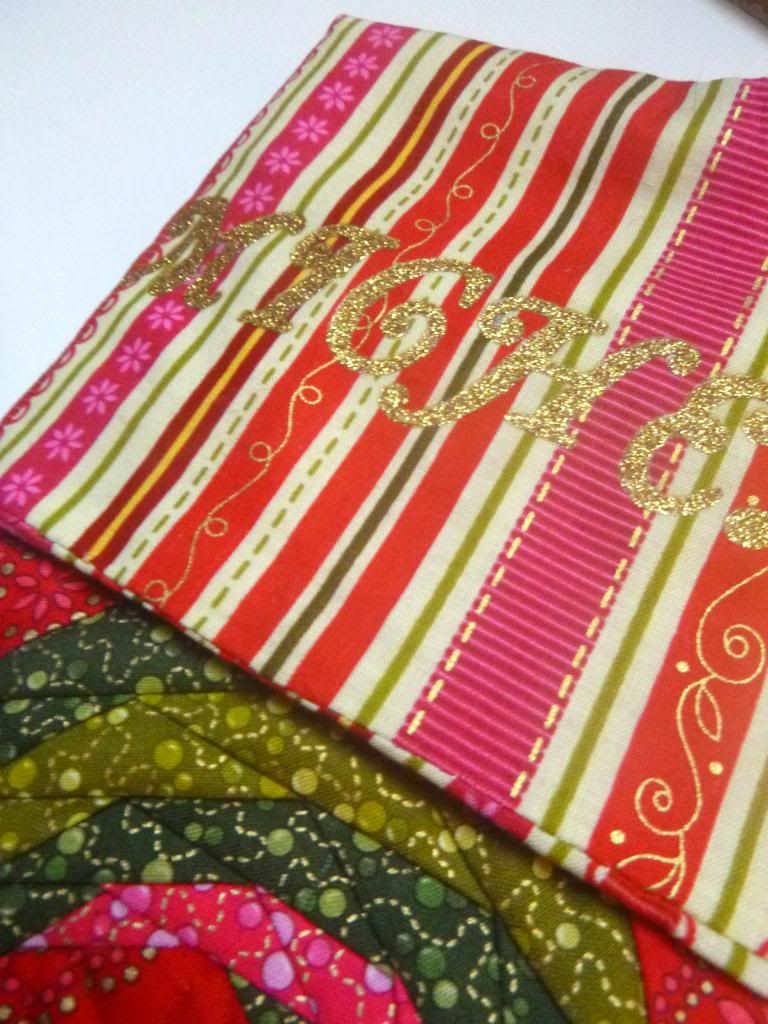
P1000480_zps5f3e2058

I had plans to applique a simple monogram on the cuff, but as I am still without the laptop I would normally use to print and transfer one, iron-on letters seemed a much better option. I chose these gold glittery ones to match the little specks of gold in the kit fabrics. I hope it will be a hit on Christmas! 

Thursday, December 13, 2012

Elf and Snowman Gift Bag Templates & Tutorial

Remember when I made my frog, owl and penguin gift bags? 

See the penguin and instructions at this post!
Well, when I was in the sketching phase for that project, I drew up many more and imagined them holding different things for different occasions. Ready to see a couple Christmas sketches made up?


Cute right? You can download templates for these guys here!

For the elf cut: 1 gift box, 1 bow, 1 hat, 2 ears (1 reversed), 1 nose and 1 head in a flesh tone, 4 of the eye/button/bell template (2 in white, 2 in yellow), 2 eye centers, 2 arms (1 reversed), 2 legs (1 reversed) and 2 cuffs

For the snowman cut: 1 gift box, 1 bow, 2 buttons, 1 carrot, 2 stick arms (1 reversed), 1 head and 3 pieces of coal. 

Fold your bags down 1 1/4 inches at the top (as shown in the previous tutorial) before you start gluing so that you're sure to be able to close them later! Otherwise, I do think they would be just as cute left open and stuffed with tissue paper! 


Place the gift box 1/4 inch from the bottom of the bag and glue in place, glue the bow down in the center of the gift box and add the head so that it is just on top of the bow (I overlapped on the snowman, wasn't intentional, but glue is kind of permanent). 

Add the elf's hat using the dotted line on your template as a guide. Glue the ears behind the head so that they line up with the bottom of the hat as shown. Trace lightly around the elf's nose with a brown crayon so that it stands out from the face and glue in the center. Glue the eye whites and centers on both sides of the nose as shown. 

Glue the arms in place so that the angled edge is flush with the sides of the bag. Add the cuffs to separate the mittens from the sleeves. Glue the legs to the underside of the bag at a slight angle with the feet facing toward each other. Glue the bells to the points of the shoes. Using a black permanent marker draw nostrils, pupils, a smile and two black dots near the tops of your bells. Draw lines from your dots in an incomplete X shape using the photo as a guide. 


To make the snowman, glue the carrot so that the flat end is in the center of the head. Draw four black dots in a square shape on each of your button eyes, use an opaque gel pen to connect the dots in an X shape . Using the photo as a guide, glue the eyes in place. Place each of your three pieces of coal at a slightly different angle in a half circle shape to form the snowman's mouth. 

Glue the arms in place and you're done! I think the snowman could also be cute without the head or the gift, if you just glued his face on a white bag and glued his arms facing outward! I didn't come to that conclusion until after I had already made the complicated version, though! 

The gift box would look great paired with the penguin templates from last time (or the owl I guess, I've seen a lot of owl stuff this Christmas)! Or imagine doing the gift box in a birthday print and using the frog! These could be combined in so many cute ways! 

Monday, December 10, 2012

Pillow with Paper Pieced Mater


I was able to add some borders to my Mater block, quilt it and put it together! It feels so good to have this Christmas present finished up! And look, free motion quilting! It's not great, but I'm proud of myself for actually attempting it, after all, that's the only way to get comfortable! 


I fussy cut scenes from the backing print for the corner blocks on the front. I think it turned out really well, especially considering that I forgot to lower the feed dogs while I was quilting! Now just to wait and see how it is received by my nephew! 

In other news, I am trying to learn how to draft paper pieced patterns, because my son has asked for something I can't find (he threw a big wrench in my plans, as suddenly the LEGO guy is not good enough). I'm not good at it so far. I improve a bit every time, but the first one I tried to do had about 179 pieces! Mater up there had less than 20...

I'm thinking I'll be doing applique for his pillow!

Friday, November 30, 2012

Holiday Lane Blog Hop

It's here! My day is finally here! I've been so excited watching the other hop participants reveal their pillows! I have to give a big thanks to Madame Samm and Pauline for hosting this huge gathering and cheering us all on!

So, without further ado, here is the back of my pillow!


I'm showing you the back first, because I fell in love with this fabric from Robert Kaufman's O' Tinsel Tree 2 line at a quilt show and immediately envisioned my Holiday Lane. I wanted those wonky doors and window panes, the cute snowman, the wreaths and lights and most importantly, the blues and grays! 


I think I was pretty successful at adapting it for Jill's pattern (which is free if you'd like to put together a Holiday Lane of your own!). 


Ready for some detail shots?


This fabric was supposed to be waves, but I had houses on my brain when I found it. I saw shingles!


I had these miniature buttons made for scrapbook pages in my stash and just had to add them to my snowman! 


It's simple, but my favorite house is this plain blue with the little Christmas tree in the window. I hand embroidered the tree next to it with a motif from my flange fabric using a split stitch. 


I substituted fleece for the wool the pattern called for and used my machine to blanket stitch it down. I absolutely love how this pattern lends itself to customization! I can't wait to see how the other ladies have personalized their pillows today! I just know you'll want to join me in visiting them!

28 Peppermint Grove-You are here!

I wanted to buy a little something to give away today, but I couldn't find the time! I thought maybe you wouldn't mind if I de-stashed a little? 


I'll give away this pretty mini-quilt and matching tote pattern I have been meaning to make for ages, along with this Clover Rose Maker in size small (I bought all three sizes and have only opened one...bad stasher!) and a little Christmas fabric surprise to one random person who comments letting me know about something they've been stashing for awhile! 

Giveaway is now closed!

Tuesday, November 13, 2012

Tie Dye Character Shirts

There has been no shortage of Scooby Doo in my house for the last month! My son Gabe and I both dressed up as characters from the show for Halloween, and this was after we had already started planning a little Scooby Doo birthday.


Mostly, Gabe's birthday consisted of some cake. We're going to put together little treat bags and possibly do a second cake over Thanksgiving with some extended family, but we couldn't let the actual day pass without some sort of celebration! 


I painted some characters on plain white shirts and picked up a tie dye kit on clearance to test out a theory I had (and to distract the kids a little). 


It turns out you can tie dye over top of fabric paint, but it is a lot of work! I'm wondering if the same effect could be gotten a lot easier by printing coloring pages onto iron-on paper. Maybe we'll try that theory next year! It would certainly be more doable for larger groups that way! 


Sunday, November 4, 2012

Did you know it's Digital Scrapbooking Day?

Or maybe it isn't today, but there are all sorts of challenges on the My Memories Facebook page and a huge blog train on their blog! A Blog Train, if you aren't familiar, is links to a ton of different blogs and, of course, a freebie at every single stop! I snagged a few goodies this weekend like this adorable, whimsical kit and this one with 109 elements

I need to get back to scrapping, but I wanted to show off one of the pages I entered into the Altered Speed Scrap Challenge on the My Memories Facebook page. It's a great way to not only tell you about all of the deals and freebies going on, but also to show you my completed Halloween costume! 


I finished my sweater just in the nick of time on Halloween day. Actually, I finished it twice! The first time I accidentally mistook one of those big bulky sleeves for the body. I should have taken a picture for the sewing fails group on Flikr. It would have given everyone a good laugh to see that! Unfortunately, I wasn't thinking that far ahead, just wanting to get it all together before it was time to Trick or Treat! 

Tuesday, October 30, 2012

Care Bears Pumpkin


Aww yeah! My Care Bears fascination has been well documented on this blog. Paintings, quilts, crib bumpers.. Tenderheart was my favorite as a kid, and as an added bonus for carving, he has quite possibly the simplest belly badge. 

A lot of work for one night, but I have always loved carving pumpkins. I remember doing Betty Boop and the cover of my favorite horror novel in my early teens. I tend to just use the patterns these days, because as Mom, I get to carve everyone else's pumpkins along with my own. I had a vision this year, though! This is all for me, and maybe a little for Caroline. 

Monday, October 29, 2012

Monday Moments & Free printable child's party hat!

Available for free download here
Are you aware that Miss Caroline is one? One whole year ago I was in the hospital meeting that tiny little girl for the first time. I am in shock! 

And very nearly on cue, My Memories offered these party hats as a free printable (or as a completely customizeable template for My Memories software owners...and if you don't own the software and would like to, there is a discount code in my sidebar!)

These are free for one week only! After that they will be available for purchase in the My Memories Store under the "craftables" category along with some of the past freebies like birthday crowns, coffin shaped treat boxes and gift bags


Look at how cute they are in the All the Pretty Ponies kit I featured here! Not as cute as the first time birthday girl, but pretty adorable all the same! 


Of course, her hat was pretty quickly ripped off and covered in rainbow icing, but I'm thinking of printing a second one for her keepsake box!


Friday, October 19, 2012

Hunger Games Clove DIY Costume Vest

Earlier in the week I posted that Victoria had decided to be Clove from the Hunger Games for Halloween. She looks like this:


Source: google.com via Melinda on Pinterest


We were able to find clothes to approximate a lot of this look, but the knife vest was a little trickier. I briefly considered sewing a vest from scratch, but, for less than the cost of a zipper at the fabric store I was able to get an old winter coat to turn into a vest. The coat part was important, because I was able to use perfectly matching fabric from the sleeves and hood I cut off to make knife pockets. 


The knife handles could be a little shorter, but these were available at the dollar store and stood out way better against the black vest than the $2 black handled knives at the party store, even if they were a better length. 


We tried hard to find a hunting type knife to put on her hip, but that's just not popular for Halloween costumes, so we ended up with an old looking dagger with a skull on the handle. I made a sheath for it from some embossed felt I found at the Hobby Lobby that looks just like tooled leather. 


It should be interesting to see how it all comes together on Halloween...and if anyone has any idea who she is! 


Tuesday, October 2, 2012

A First


I tried my hand at dyeing fabric for the first time ever last night. That is, unless you count tie dyeing, which I think is a whole different experience than dyeing one thing all the same color. So these socks are now Rit Sunshine Orange. Kind of loving them and wondering why I didn't throw more items into the dye bath, this color makes me really happy! 

The box says that items that aren't 100% cotton won't reach full color, but I concentrated it a little bit by removing one gallon of water and these turned out awesome! Very Velma, I think! 


Wednesday, August 29, 2012

Punk/Goth Bears

I mentioned last week that I was sewing up a pair of punk/goth teddy bears like the one I made for my sister back in March. Her friends really loved hers, so she asked me if I could make them some on the cheap. 

To keep the cost down I used acrylic felt, painted the faces (instead of a combination of paint and embroidery), used almost all scraps and made them about 50% of the size. I still think they came out really good!

Bears altered from this Dolls and Daydreams panda pattern

I was already experiencing the beginning of the sinus infection that has me completely laid up today, so I didn't have much patience for photography. I'd find a shady spot and the wind would blow my tree cover away. I got three photos before I said, "Screw it."

Pleated skirts also by Dolls and Daydreams. Fuzzy boots are my own. 

It isn't very clear in the picture above (or this one, really, sinus infection, remember?) but I just had to try to get a better shot of the lace overlay with little red spiders on the web printed skirt. 

I wanted the girls to be on cell phones, texting each other. One was going to be saying "OMG!", while her friend said, "SRSLY?" I couldn't figure out how to do it, though. Polymer clay was my only thought, but then how would they carry them? I ended up leaving well enough alone and shipping them out last night. I can't wait to hear the reactions! 

Sunday, July 22, 2012

A sewing finish!

Back in March I posted a photo of an embroidered face I had finished for a doll. Recently, a very good friend asked me if I had anything I could finish quickly for an auction to benefit the family of a cancer victim. I love it when things come together perfectly!


I love how she turned out in vintage inspired prints in red/pink and blue! I may whip up something else for the silent auction if I have time, but I have a couple other projects that I have promised to my youngest sister that I need to finish first. 


If you'd like to make your own bunny, the pattern can be found here, as can the skirt. I seriously altered it to make this gathered, aproned number, but the skirts included are so cute! 

Monday, July 2, 2012

Fourth of July (and other) Scrapbook Freebies

It's Monday, though later than I planned on Monday, and I am back, as promised with the new My Memories Freebie! Cupcake wrappers and toppers (per my request on their Facebook group)! 


Independence Day decorated cupcakes

This adorable Fourth of July set (and you can use the papers to scrap your weekend festivities later)! 


Picnic Themed Decorated Cupcakes

This adorable picnic themed set that also comes with some great, basic, tone on tone colors. 


Black and White Themed Decorated Cupcakes

And this, seriously classy black and white set! This time they're pretty self-explanatory. Just cut out and tape the wrappers together. For the toppers, either cut out or use a 1 1/4 inch circle punch and adhere to a toothpick with adhesive foam squares. You can even tie cute little ribbon around the picks! 


Of course, you can use any paper in these templates, including outside content! It's so easy to use papers from designers who aren't affiliated with My Memories! Here are some cupcakes I decorated with both My Memories and outside content. 


The bottom two cupcakes came from this adorable Father's Day kit that I think could also make great cupcakes and cards for a dad's birthday (my husband's is coming up soon)! 


The top cupcake and this one were decorated with a kit called Birthday Circus that contains, birthday, party, circus and carnival themed items. It's really cute and versatile! How adorable would these be paired with the crown freebie from a few weeks ago? 

Lastly, if none of these freebies were up your alley, I do know of one more out there. Erin Bradley has a really cute group of Fourth of July themed papers available for free right now! She has a ton of cute stuff on her site that would make an amazing themed party!