Showing posts with label tips. Show all posts

Tuesday, March 12, 2013

Some Little Pillows & Some Big News

Let's just start this off by saying I am not pregnant. I think any time a married woman in her 30's has big news that's where we all jump to, but seriously...not me! I won't say never again, because the last time I was "done" having children God laughed at me and gave me Caroline less than a month after I made that decision. 


I made these little pillows from a clearance shower curtain I found at Target. Roughly four yards of adorable, kid friendly, stain resistant decorator weight cotton fabric for $9.98? Yes, please! 


I did a simple envelope back on the pillows so that they would be easy to take off and clean. It also really simplified my sewing as I was able to use the existing hem on the bottom of the shower curtain for the top part of the envelope. 

So, why am I making these cute little pillows (12 X 12 and 12 X 16)? We're moving! One of the things we were looking for in a new house was a playroom for the kids, and I'm happy to say that our new house allows for that. However, the layout of the house is such that the kids' playroom will be the first thing anyone sees when they come in our front door. Yuck! 

Trying to plan cute, functional decor for a kids' space that will make the first impression of my entire home? Um...hard! If anyone has any tips on that, I'm all ears! 

Friday, March 8, 2013

More Digiscrap Pages & Some Tips

I may have mentioned once or twice (or maybe even a dozen times) that I am participating in the 2013 Cover to Cover challenge with My Memories. The goal is two pages per month for 2013, and I set an additional goal for myself to finish scrapping 2011 at the same rate. 

I'm really pleased that I have completed five pages for each of these books! Since a few of these haven't been shown on the blog, I thought I'd post them up here and to my ever-growing gallery on Pinterest. 


Kit is Ice Ice Baby by Connie Prince
First up, is a page I scrapped in early February. I had been wanting to play around with QR codes for awhile, and decided to finally bite the bullet. I found this QR code generator online that is free and lets you customize the color of your code. How perfect for scrapbook pages is that? I turned this one a deep blue/purple and it coordinates wonderfully! Definitely a site you should bookmark if you'd like to try this on your pages. 

Layout, except for microphone, made with Bella Gypsy's Besties and coordinating freebies that are no longer available. 
Next up is the result of a Speed Scrap and some small scale photos I took at a school fundraiser. I thought the colors in this kit were perfect for a group of tween girls and as a bonus they coordinated awesomely with the microphone from a Connie Prince kit I had on hand. (Connie's just getting tons of love from me today!)


And lastly, we have the page that gave me fits! I kept trying, and trying to create this page, but nothing seemed to work. I couldn't make my boarding passes large enough to read while keeping my scan of my 4 X 6 photo large enough to see and have room for the journaling that I felt was really necessary since I only had one real photo (all that was allowed) of the exhibit we attended. 

Someone in the Cover to Cover Facebook group suggested to me that I ignore the warning the program gave me about how my photo could pixelate and use it as my background. She said she had done it several times and never actually had a photo come out bad. So I got brave and tried it. I layered the photo over top of this great weathered damask paper, made it sepia toned and adjusted the opacity enough to let some of the texture from the background show through. It kind of reminds me of the look of a lot of the papers that were salvaged from the Titanic wreckage, and if it pixelated, I can't tell! Maybe the weathered background hides it? 

Since you can see a lot of the detail in the large background photo, I didn't feel bad about putting a very small original in there, which finally left me enough room for my boarding passes and the journaling I wanted. I threw together a bunch of elements in nautical colors to add a little 
punch to the page and bring out the red of the White Star Line logo. I'm so glad to have the group at my finger tips to help me along with these pages! 

Thursday, January 10, 2013

Two new scrapbook pages

In my last post, I listed the scrapbook pages I hope to complete for 2012, and to my surprise, there weren't many! I spent some time pinning page sketches and have decided to try and complete my entire book by the end of next month (I have a free photo book coupon that expires then)! Normally, sketches are where I turn when I'm just stuck about something, but I'm starting out with them now because I'm in a bit of a time crunch, but still want a customized look.

Sketch inspiration here, kit used is Flakes and Fun
Sketch inspiration here, free alphas here
I combined a few things and tried some new for Victoria's soccer page! The kit I used for this one is Hoo-Who Loves You and I think the colors and patterns are really great for tween and teen girls! However, owls were not what I was looking for on this page. I took a soccer ball from another kit and tried out the new recolor feature in My Memories. I think it turned out pretty good! Of course, I mentioned before that recoloring does mess with the shadows, so I had to create and shadow a second circle to place behind them, but I don't think you can tell! I'm so glad this feature is available now, otherwise I would have had to buy a whole new kit just to get a ball that wasn't orange! 

Sunday, January 6, 2013

Scrapbooking Tips for Beginners and My Memories Tutorial

I recently posted a resolution to actually finish my scrapbooks so that I can get them printed, as my also recent hard drive crash made it apparent that printed books are far better than incomplete files on a computer! Coincidentally, My Memories has started a "Cover to Cover" project! Two pages per month and a complete book for 2013 by the end of the year. My plan is to work on 2012 and 2013 simultaneously and complete the book I was half done with when my computer crashed and a new book at the same time! 

My Memories has made a Facebook group for this project, and many of the people in it are completely intimidated by digi-scrapping, just starting out and not sure where to go! I wouldn't claim to be an expert, but I do remember being in that position, and I thought I'd take the opportunity to share where I started out! 

When you want to sew, you start with patterns, when you want to draw, start out tracing...when you want to scrapbook start with sketches or templates! It can take the pressure off of you for designing and really give you a chance to learn what you're doing, while pretty much guaranteeing you a great page! 


So, here is a fairly simple sketch for a page with one photo that I am going to be putting my spin on. Notice there is one photo, there are three flowers and four paper shapes, but only one has rounded corners. This is called the Rule of Odd. Not to say that great pages can't be made with even numbers, but it's definitely something to keep in mind if you feel like your pages are lacking, try taking away a flower, or changing one shape into another, or adding just one button. It could help! 

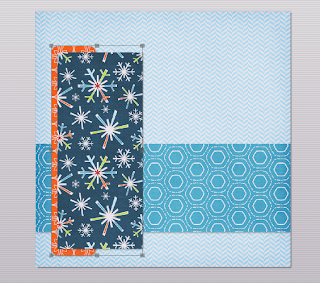
Normally, I would start with the furthest thing back on the page, but in this case, I'm going to start with the large, gray rectangle. It's touching everything and looks like a good piece to use to judge the positions in the rest of the layout. 


Choose a background, then using the shapes tap, add a rectangle. Enlarge it to the length of the layout and adjust the width before clicking to select your paper (or photo if you're using outside content). Your image may be distorted if you do it the other way. 


Next, you'll see I have added the strip with rounded corners. This shape is smaller, so you may want to double click on it once you have added your paper to zoom in and move the pattern around. I like to shadow as I go along, but some people prefer to do it later, and some don't like to use them at all. It's just a matter of preference. To add a shadow, click on your shape to select it, then click the shadow box in the upper right of your shapes tab. From there you can adjust where the shadow sits, how intense it is, and the amount of blur. 


In this photo, I have added the second large rectangle to the layout, shadowed and filled it with paper. Now I am going to group them together and send them to the back of the layout, behind the largest rectangle to match the sketch. To group them, first click on one, then hold your control key while clicking your second. Right click (or use the arrange tab at the top) to select arrange and group. Once they are grouped, right click again and select "send to back" to position them directly on top of your background paper. 


Now we're going to add our last shape to the page. Use your other shapes as a guide to position this final rectangle.  


Here, I decided I didn't like the look of that solid blue. To change the paper in your shapes, simply click on it and select the paper or photo tab again and select a new image. This can be done at any point in your layout, so don't be afraid to try something! 

The next step shown in the above photo is adding a photo box. I prefer to adjust the box to the size that will fit my layout and then double click to add my image. That way, I know that it fits and I don't need to guess with cropping. 


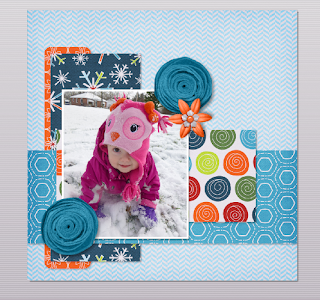
Now, the page is really starting to come together! I selected a photo of my daughter and added three flowers found in the embellishments tab. When using two identical embellishments as I did in this page, I like to either mirror or rotate one so that, at first glance, they don't appear to be the exact same thing. 


At this point, I have decided to add my title. I find the grid (the graph paper looking icon along the top) to be really useful when lining up monograms or alphas. I chose to align my letters along the uncluttered area at the top of my page where it is easier to see. There is a function in My Memories called "snap to grid" that a lot of scrappers use to align their letters, but I prefer to manually place mine. Try it and see which way you like! 


Here, I selected all of my letters and grouped them together. I scaled them down (while grouped, so that they all remain in the same proportions) and moved them to the bottom right of the layout in a slightly different position from the one in the sketch.  

You may also notice that I changed the position of the dotted paper again. That one circle of really bright green was too distracting for me. If something stands out too much you have two choices, remove it, or add more of it! Double clicking on the shape and moving my image allowed me to have three bright green circles in my layout, and now it isn't taking away focus from my photo! 

Kit used is Bella Gypsy's Be Merry
To finish, I added two small text boxes. One for a short bit of journaling, and the other for the look of a handwritten date in the bottom corner. 

If you have any questions, feel free to leave them in the comments and as long as you are not a "no reply" blogger, or as long as you leave your email, I will respond to you directly and try to help! 

Monday, November 19, 2012

Monday Moments: Scrapbook Edition & digiscrap tip


I keep forgetting it's Monday! My head is buzzing with things I need to get done before the holiday and I just kept spacing out on why it was I opened the laptop...

Here is the result of last night's Speed Scrap on the My Memories Facebook page. When the directions called for one photo I scrolled through my pics and found this gem. I had plenty of recent events with two or three pictures, but nothing that stood on its own. I'm glad, though! This sweet moment from the summer definitely deserved a page! 

How do you like my Michigan? It's a word art! I downloaded this font and used it in the word art to fill with paper and shadow. I love how it looks just like a fancy die cut! Dingbat fonts can be great tools for the digital scrapper! Do you have any favorites I should know about? 

Sunday, February 12, 2012

Penguin, Frog and Owl Gift Bags Tutorial


Alright, so I know it's late, but I made these and then decided I should whip up another and give you a little tutorial. And, in the spirit of trying new things (one of my New Year's resolutions) I decided to do the templates in PDF form for you to download here!

Valentine's Day is tomorrow, but these are so super easy to make up and so cute! They make adorable gift bags, and could even be put together by older kids as Valentine holders for classroom exchanges. Ready to learn how?

For each animal you will need:

Printed PDF templates
Scrapbook paper scraps
One lunch sized gift (or brown paper) bag
Scissors
Glue stick or double sided tape
Opaque gel pens (for optional decorative "stitching")
Black marker for the Frog's mouth
Scalloped or pinking edged scissors for Owl eyelashes
Stickers to seal the edge of the bag

Print and cut out the template pieces for the animal(s) of your choosing.

Trace around your templates on the wrong side of your printed papers. For each animal you will need:

One head
One small heart
One large heart
One beak (for Owl and Penguin)
Two eyes (reversing, or tracing the opposite side of the template, for one of the Frog's eyes)
Two feet (reversing one for all animals)
Two wings, arms or flippers (reversing one for all animals)
Two cheeks

For the penguin only: Two more cheek pieces in a black print for eye centers
Face piece for inside of head

For Owl only: Two pieces of paper measuring 1/2" X 1 7/8" for eyelashes

Glue or tape the penguin's face piece inside the head, using the dashed lines inside the template as a placement guide.

For all animals: Place the eyes and cheeks using the dashed lines on the templates as a guide.

For the Owl: Using your scalloped or pinking edged scissors cut a small amount off of one edge of your eyelash pieces. Place these so that the scalloped edge is toward the bottom of the head and the top corners are lined up with the outer edge of the eye. (See finished photo at bottom.)

For the penguin: Place the black pair of cheek pieces inside the eyes.

For the Owl and Penguin: Place the beaks last, again using the dashed lines as a guide


For the Frog: lightly draw a curved line between the cheeks with a pencil. Using your black marker draw five small rectangles along the curved line to create the frog's mouth. Erase the marks in between your rectangles. (See finished photo at bottom.)


Fold down 1 1/2" from the top of your bag.

Glue or tape (tape may work better if you are using a glossy surface like the gift bags I have chosen) the heads onto the bags so that they overhang the folded down edge.


Now assemble your heart by centering and gluing the small piece inside the larger one. Attach the assembled heart to the bag 1/2 to 3/4 inches from the bottom, making sure to leave a small space between the heart and the head.


Add arms, wings or flippers depending on which animal you are making. Use the completed photos as a guide to placement.

Put glue or tape along the top 1/2" of your foot pieces. Attach the glued areas to the underside (bottom) of your bag at or near the corners.

Draw optional decorative stitching with your gel pen.

Now you're ready to open them up and fill with treats!


Friday, February 11, 2011

Easier Hexagon Tutorial


If you're like me, you have been seeing gorgeous things made from hexagons all over blogs, Flikr and Etsy for months, but the thought of making your own hexagons...ugh!

Typical sewing with hexagons is exhausting just to explain. You cut out dozens of tiny paper hexagon pieces, you cut out dozens of tiny fabric hexagons 1/4" larger than your paper ones, you sew the fabric to the paper with basting stitches, you sew the hexagons together by hand, then you take the basting stitches out.

Why, oh why, would anyone go through all of that? I am far too busy/lazy.

So, first things first. Get yourself some of these. Reusable, heat resistant Teflon hexagons. No paper to cut out! Step one, DONE!

The instructions on these things are about useless. No pictures and pretty vague. Run a basting stitch, remove shape with tool...huh? Ignore them.

It says to cut your fabric 1/4" larger than the Teflon shape, but I have found that Teflon is slippery (who knew?) and that 1/4" is way too little room for that thing to slide around. I like 1/2". So, cut your fabric into 2 3/4" squares and it ends up just about perfect.


From there, center your hexagon on the square and I like to clip off just the tips of the corners to reduce bulk. You don't have to, and could eliminate that step too, but I do.


Now, thread your needle. You're going to want about two feet of thread on there, any more and you'll be upset with yourself for wasting it. Double your thread by bringing the needle to the middle and tying the ends in a knot.

Fold your fabric around one corner of the hexagon.


Stitch like this (there is a great illustration here) just in the corner.


Continue all the way around the shape. Basting this way means no stitches to rip out when you're done! All of your stitching remains hidden on the back of your shapes!


When you get to the end, run one last stitch back to your starting point, but before you close the stitch completely, run your needle through the center so that it forms a knot when you tighten it.


Trim your thread and you are ready to iron. Spray a little starch on your hexagons (I have tried it without the starch and they do tend to lose their shape) and press.

Now take that little straw that came with your hexagons, and insert it in the hole in the middle. Push down on it gently in the direction of one corner while pulling back on your fabric. Loosen two corners this way and the whole shape will easily pop out.


Press your shapes one more time and they're ready to sew with. Sadly, I can't help you shorten this part. You still do have to hand sew them together, but I've cut a bunch of steps out of the process...which should make it a little less daunting if you were on the fence.


Friday, January 14, 2011

Repurposed

Almost two years ago I posted my patchwork bag tutorial. Back when I made those bags, I accidentally cut enough fabric for two of the second one. I have had the front and back panel of that bag unfinished in my basement since April, 2009. Yikes!

I went on the hunt through my stash to find some baby girl appropriate fabrics to make a gift out of and stumbled across those panels. I decided that, realistically, I probably wasn't going to make them into another patchwork bag, and brought them out to make one of my favorite patterns.


Mrs. Perkins by Melly and Me! I cannot sing the praises of this pattern enough. It has never failed to turn out adorable, no matter what fabrics I make it in and kids just love the 19" tall giraffe, especially babies!


I like her better with buttons, but I hate the thought of her sitting on a shelf because the baby's mom is too afraid to let her play with it. I stuffed a cat toy deep inside this one, a trick I cannot remember where I picked up. Just a little bell in a plastic ball so she rattles very quietly. And not a choking hazard because the bell and ball are surrounded by layers of stuffing and fabric.

While I'm sharing tips and tricks, let me show you one of my favorite ways to make stuffed animal eyes.


Polka-dot print felt! The irises are already printed on for you to just cut out little ovals or circles. I bought every square of this blue that I could find when it went on clearance at a local craft store. If I ever find more colors (maybe I should Google that?) I will buy them for sure! It's nice to have the option of a shortcut sometimes.


P.S. Some other Mrs. Perkins I have made since the blog can be found here and here.

Saturday, April 24, 2010

Current & upcoming freebies

Mother's Day is just around the corner (May 9). Do you know what your mother is getting? I am making something extra awesome for mine and writing a tutorial for it as I go, so stay tuned, I may have the holiday covered for you.

And if you haven't heard already, Shutterfly is offering three free cards in honor of the holiday. Just enter the code CARDS4MOM at checkout and all you pay is tax and shipping. I ordered my three custom photo cards (a different one for each mom/grandma in my life) and spent just over a dollar for something far nicer than you can get in a store.

Monday, April 5, 2010

10 cent party invitations

Isn't it always the truth, that even if you can make damn near anything, what your child wants is the licensed character stuff you have to buy? This year it's Littlest Pet Shop toys, and they aren't only on the birthday list, they are to be the theme for the party.

Wouldn't you know that in my fairly large city, the largest party store carried absolutely NONE of the Littlest Pet Shop party supplies? I hate buying party supplies online because once shipping is added it's pretty atrocious, so after I searched a few of the smaller stores for good measure, I sat down to figure out a new way to get this done.

I bring you part one: the invitation.

I turned this...


Into this...


With some scrapbook paper bits and the help of Picnik, I was able to take and edit a photo that can be printed at any drug store for $0.10! Completely within my budget while also completely complying with the insisted on theme!

First I cut scrapbook paper circles, then I glued them to a sturdier card stock circle and cut them in a Pacman shape. I folded the ends together (cutting more off if necessary to get the right size) and glued along the edge to make the cone shape. Then I glued on a miniature pom-pom (a bag with way more than I needed was $0.99 at Hobby Lobby). The cake was a lot more complex, and I'm glad it's blurry in all of the photos because it looks way better that way. HA!

My initial idea was to create a whole little diorama of a Littlest Pet Shop party, but I quickly realized, after one photo, that if I wanted room for text I had to really, really scale back on my plans. So I limited the photos to two characters or one character and the cake. I am very pleased with how they turned out.

I'm offering you the idea for your own cheap party invitations by slapping a little hat on any old toy out of your kid's stash. Or, if you're like me with a Pet Shop obsessed little girl, you can doctor one of mine to fit your situation. Accounts at Picnik are free and the tools to do all of the edits you see here are free too, save the jpeg file to your computer and print them off anywhere, cheap!


Wednesday, March 3, 2010

Just something I picked up


Bear with me here, this is not just another Dolly Donations post, though these unfinished dolls are for the orphans in Haiti. This is a little something I figured out when I was making my still unfinished vampire doll.

You see, shoving those fairly firmly stuffed, gangly limbs into what was definitely not a very large doll body sucked. I wish I knew of a less crude word that truly describes that experience, but that one just seems to fit. Anyway, I finished with her and found that after all of the straining to get everything right, both of the legs and one arm still ended up pulling away and not getting caught in the seams...not completely.

That's when the idea struck to not stuff the limbs! Wow! I cannot believe that it took me so much pulling and fighting with my sewing machine to realize the way things should be done. Now, doing it this way does require more hand sewing, which I know a lot of people despise, but I find it way less irritating than wasting my effort on a technique that doesn't always work.


So here's what you do, leave a small opening in the underside of the arm (or leg), similar to what you would leave for turning out a project. Simple, right? You can keep everything nice and flat while you're sewing, and when you're done you have just a tiny hole to put your stuffing through and sew up by hand. Leaving the opening on the underside of the limb means that your stitching is well hidden and you still get the polished look of machine sewing without all of the struggle! I can't see a reason to ever follow pattern directions again!