Tuesday, January 29, 2013

Huge scrapbook catch up post

Ah, life! It has been so busy around here lately! I'm still working hard on my goal of finishing my 2012 scrapbook by the end of February. At the same time, I am working on the My Memories Cover to Cover series to stay on top of 2013 (and 2011). That is a lot of scrapbooking! 

This week I finished my second two page layout for both our Chicago trip and the second circus we attended last year. I only have four single pages left to do to finish my book! 


Kit is Rawr! And will be retiring next month so grab it for $0.99 if you like it! 

Kit is Birthday Circus. Sketch inspiration found here

I was also able to participate in the Speed Scrap on Sunday and used the opportunity to get a page for my 2011 book done. Hooray! 


Kit is I Love Rock 'N Roll
I completed my first page for 2013 loosely based on a sketch I found on Pinterest.  I am so excited about the prospect of being caught up and staying caught up! I love being able to look through actual printed albums and share them with my friends and family! 

Sketch inspiration found here. Background paper and music elements from this freebie
So, there was my week in Scrapbook pages. What have you been up to? 

Friday, January 25, 2013

Mystery Block of the Month

Riley Blake, known for their chevrons, is hosting a Mystery Block of the Month for 2013. Of course, their first block is a chevron pattern! It's cute, free and lasts until September! 

I would love to have went out and bought new fabric for this, but I really, really have to get my stash cut down. It's hard to convince myself I need more when there are totes stacked up taller than me in the basement holding all sorts of goodies. So, given the small scale of this first block I chose the Timeless Treasures mini owls and some coordinating prints from my stash.  


I'm pretty happy with it. It's cute, but boyish, which doesn't happen in my sewing too often! I have some navy blue, bright yellow, orange and brown that I plan on using later. Block two comes out the second Monday in February, so there's still plenty of time to join up and be caught up! 

This kind of flies in the face of my resolution to try and quilt one thing at a time, but I figure that I'm not really good at that, and perhaps a forced once a month break from my other projects will help keep me on track? Or maybe I'm just justifying the fact that I want to participate! 

Now...what do I do with my block until September? How do I store it so it isn't frayed to bits by then? Any advice from you regular BOMers? 


Wednesday, January 23, 2013

Two Page Scrapbook Layout

Okay, okay, I promise that I fully intend to start sewing something tonight (or at least fabric cutting tonight), but in the meantime, you just have to bear with me as I finish up scrapping 2012. I'm getting really close! 


I pinned this page sketch because I thought that little banner was really fun and would make a great circus layout. When I pinned it, I didn't even know that my circus kit actually had a near identical banner in it! That was a pleasant surprise! 

Kit is Birthday Circus with added popcorn
I made the basic background of my page and then inserted a duplicate. The banners, ribbon and papers lined up perfectly this way! I opted to put the small cluster of three photos on the opposite page and put a journal tag and an embellishment cluster in their place. I think this turned out so fun! It's one of the few pages I had to redo and I'm glad I got the chance. This is way better than my original that I lost in the hard drive crash! 

Monday, January 21, 2013

Scrapbook pages & a special request

Kit is Siblings are Forever

I did the Speed Scrap last night on the My Memories Facebook page. I needed a single page in my 2012 book that I'm finishing up to keep a two page layout together, so even though I am planning on doing a separate book of the kids professional photos, I created a single page highlighting how hectic that day was. These are some of my favorites of the "bad" pictures, because you can just see how each kid was doing their own thing! 

Kit and alpha are Forest Friends
I also made a page for our lunch at the Rainforest Cafe. I'm getting so close to finishing 2012! I used a Mye De Leon kit for this page, which brings me to the special request part of this post. Mye has been a favorite designer of mine for a long time, and she needs help. I have used her kits to create some of my favorite pages like this one and this one.

If you are a digital scrapper, please consider buying something from Mye, as she is desperately trying to raise money for a surgery her newborn son needs to live! There is also a place to directly donate and a $20 mega kit that you can purchase to benefit her sweet baby! Nothing like fueling your habits and helping out a great cause! 

Wednesday, January 16, 2013

Catching up!


I've been playing a lot in My Memories this week! I made a second page for my pumpkin patch photos that did not include the awesome pumpkin gun


I also have been working on making a page template that works for two page layouts, as I have quite a few to configure for my 2012 book (that I am nearly finished with)! So here is my stab at it...I'm going to use it again for pictures from the museum and we'll see how it looks then. I like this page, but I think with the little paper ribbons it might be a little too distinctive to use multiple times in a book? I'm not sure! I think it will be okay to use it for all of the Chicago pages, as it will tie them together nicely, but maybe not for my other two page layouts? 

Monday, January 14, 2013

Monday Moments Scrapbook Edition

Are you getting tired of the scrapbook pages yet? I hope not! I still have several more to complete before I even start 2013 (and 2011?)! 

Last night was the Speed Scrap on My Memories Facebook page. When we were told to have three photos ready I quickly looked through the list of pages I wanted to complete and saw an event that I had three great photos for. 

Kit is called Falling for You, but I think it's retired...sorry! 
We've been searching for a new pumpkin patch since our old one went crazy raising their prices and started making us wait in 20 minute lines (always fun with kids)! Every year we have auditioned a new place, and I think we may have found a winner! The kids had so much fun playing with the pumpkin gun here! Gabe even shot it off a couple times before the noise bothered him too much...that boy doesn't even like the hand dryers in public restrooms, so that says a lot! I'll be turning this into a two page layout with the rest of the photos from that day.

Thursday, January 10, 2013

Two new scrapbook pages

In my last post, I listed the scrapbook pages I hope to complete for 2012, and to my surprise, there weren't many! I spent some time pinning page sketches and have decided to try and complete my entire book by the end of next month (I have a free photo book coupon that expires then)! Normally, sketches are where I turn when I'm just stuck about something, but I'm starting out with them now because I'm in a bit of a time crunch, but still want a customized look.

Sketch inspiration here, kit used is Flakes and Fun
Sketch inspiration here, free alphas here
I combined a few things and tried some new for Victoria's soccer page! The kit I used for this one is Hoo-Who Loves You and I think the colors and patterns are really great for tween and teen girls! However, owls were not what I was looking for on this page. I took a soccer ball from another kit and tried out the new recolor feature in My Memories. I think it turned out pretty good! Of course, I mentioned before that recoloring does mess with the shadows, so I had to create and shadow a second circle to place behind them, but I don't think you can tell! I'm so glad this feature is available now, otherwise I would have had to buy a whole new kit just to get a ball that wasn't orange! 

Tuesday, January 8, 2013

"Cover to Cover"..What I hope to accomplish

I have been hopping around the internet trying to access some of my scrapbook pages that I lost in my hard drive crash. As part of the "Cover to Cover" series My Memories is hosting, I had wanted to complete my 2012 book while working on a new book for 2013. I'm happy to say that I was able to retrieve a bunch of my work, and I'm feeling ambitious about maybe finishing 2011 as well! I wanted a go-to list of events I want to scrap so that when a challenge comes up, I'm not left flailing around wondering what I need to work on to meet my goal! 

2012
Kids playing in the snow
Nite Lites
Gabe sitting with Santa
Getting our tree
Caroline at Thanksgiving
Me and my sister
Gabe's birthday
Halloween
Caroline's 1st birthday
Pumpkin Gun/New Salem
Michigan's Adventure
Soccer
Circus
Duck Lake
Legoland/Rainforest Cafe/Field Museum
Photo shoot
Victoria's birthday
Easter
Circus
Gabe's Snowman

2011
Caroline's First Christmas
Santa Train
Getting our tree
Thanksgiving
Gabe's birthday
Halloween
Caroline coming home
Caroline's hospital pics
Caroline's first photo
Setting up the baby's room
Bowen's Mill
My birthday
Baby Showers
Beach
Ft. Wayne
Easter
Victoria's birthday
The ocean
Graduation
Monster Jam


Sunday, January 6, 2013

Scrapbooking Tips for Beginners and My Memories Tutorial

I recently posted a resolution to actually finish my scrapbooks so that I can get them printed, as my also recent hard drive crash made it apparent that printed books are far better than incomplete files on a computer! Coincidentally, My Memories has started a "Cover to Cover" project! Two pages per month and a complete book for 2013 by the end of the year. My plan is to work on 2012 and 2013 simultaneously and complete the book I was half done with when my computer crashed and a new book at the same time! 

My Memories has made a Facebook group for this project, and many of the people in it are completely intimidated by digi-scrapping, just starting out and not sure where to go! I wouldn't claim to be an expert, but I do remember being in that position, and I thought I'd take the opportunity to share where I started out! 

When you want to sew, you start with patterns, when you want to draw, start out tracing...when you want to scrapbook start with sketches or templates! It can take the pressure off of you for designing and really give you a chance to learn what you're doing, while pretty much guaranteeing you a great page! 


So, here is a fairly simple sketch for a page with one photo that I am going to be putting my spin on. Notice there is one photo, there are three flowers and four paper shapes, but only one has rounded corners. This is called the Rule of Odd. Not to say that great pages can't be made with even numbers, but it's definitely something to keep in mind if you feel like your pages are lacking, try taking away a flower, or changing one shape into another, or adding just one button. It could help! 

Normally, I would start with the furthest thing back on the page, but in this case, I'm going to start with the large, gray rectangle. It's touching everything and looks like a good piece to use to judge the positions in the rest of the layout. 


Choose a background, then using the shapes tap, add a rectangle. Enlarge it to the length of the layout and adjust the width before clicking to select your paper (or photo if you're using outside content). Your image may be distorted if you do it the other way. 


Next, you'll see I have added the strip with rounded corners. This shape is smaller, so you may want to double click on it once you have added your paper to zoom in and move the pattern around. I like to shadow as I go along, but some people prefer to do it later, and some don't like to use them at all. It's just a matter of preference. To add a shadow, click on your shape to select it, then click the shadow box in the upper right of your shapes tab. From there you can adjust where the shadow sits, how intense it is, and the amount of blur. 


In this photo, I have added the second large rectangle to the layout, shadowed and filled it with paper. Now I am going to group them together and send them to the back of the layout, behind the largest rectangle to match the sketch. To group them, first click on one, then hold your control key while clicking your second. Right click (or use the arrange tab at the top) to select arrange and group. Once they are grouped, right click again and select "send to back" to position them directly on top of your background paper. 


Now we're going to add our last shape to the page. Use your other shapes as a guide to position this final rectangle.  


Here, I decided I didn't like the look of that solid blue. To change the paper in your shapes, simply click on it and select the paper or photo tab again and select a new image. This can be done at any point in your layout, so don't be afraid to try something! 

The next step shown in the above photo is adding a photo box. I prefer to adjust the box to the size that will fit my layout and then double click to add my image. That way, I know that it fits and I don't need to guess with cropping. 


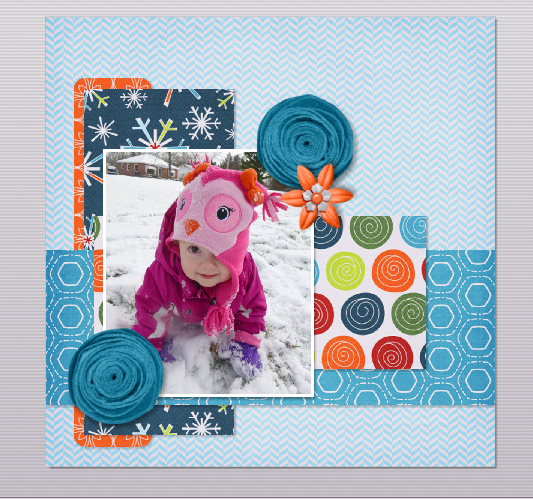
Now, the page is really starting to come together! I selected a photo of my daughter and added three flowers found in the embellishments tab. When using two identical embellishments as I did in this page, I like to either mirror or rotate one so that, at first glance, they don't appear to be the exact same thing. 


At this point, I have decided to add my title. I find the grid (the graph paper looking icon along the top) to be really useful when lining up monograms or alphas. I chose to align my letters along the uncluttered area at the top of my page where it is easier to see. There is a function in My Memories called "snap to grid" that a lot of scrappers use to align their letters, but I prefer to manually place mine. Try it and see which way you like! 


Here, I selected all of my letters and grouped them together. I scaled them down (while grouped, so that they all remain in the same proportions) and moved them to the bottom right of the layout in a slightly different position from the one in the sketch.  

You may also notice that I changed the position of the dotted paper again. That one circle of really bright green was too distracting for me. If something stands out too much you have two choices, remove it, or add more of it! Double clicking on the shape and moving my image allowed me to have three bright green circles in my layout, and now it isn't taking away focus from my photo! 

Kit used is Bella Gypsy's Be Merry
To finish, I added two small text boxes. One for a short bit of journaling, and the other for the look of a handwritten date in the bottom corner. 

If you have any questions, feel free to leave them in the comments and as long as you are not a "no reply" blogger, or as long as you leave your email, I will respond to you directly and try to help!