Showing posts with label quilting. Show all posts

Monday, February 11, 2013

Um...HELP!

I was all excited for today, as it is the day Riley Blake revealed the second block in their Mystery Block of the Month series. If you remember, my first block looked like this. 


Fairly masculine, or unisex at the very least. My plan for this quilt was to use the owl fabric in every block and keep it in the bolder, boyish colors. And even though it's a Mystery Block of the Month, I didn't quite see how they could throw anything at me where I might not be able to keep on my theme. 


And then this showed up on Pinterest, block two. Can hearts be masculine? My first instinct was to go brown or orange for these scraps, but then I have no owls. I think all blues may be overkill though, as I was planning on a bit of blue in every block and don't really want a blue quilt. So, where am I to go? What would you do? 

Friday, January 25, 2013

Mystery Block of the Month

Riley Blake, known for their chevrons, is hosting a Mystery Block of the Month for 2013. Of course, their first block is a chevron pattern! It's cute, free and lasts until September! 

I would love to have went out and bought new fabric for this, but I really, really have to get my stash cut down. It's hard to convince myself I need more when there are totes stacked up taller than me in the basement holding all sorts of goodies. So, given the small scale of this first block I chose the Timeless Treasures mini owls and some coordinating prints from my stash.  


I'm pretty happy with it. It's cute, but boyish, which doesn't happen in my sewing too often! I have some navy blue, bright yellow, orange and brown that I plan on using later. Block two comes out the second Monday in February, so there's still plenty of time to join up and be caught up! 

This kind of flies in the face of my resolution to try and quilt one thing at a time, but I figure that I'm not really good at that, and perhaps a forced once a month break from my other projects will help keep me on track? Or maybe I'm just justifying the fact that I want to participate! 

Now...what do I do with my block until September? How do I store it so it isn't frayed to bits by then? Any advice from you regular BOMers? 


Friday, December 21, 2012

Christmas Stockings

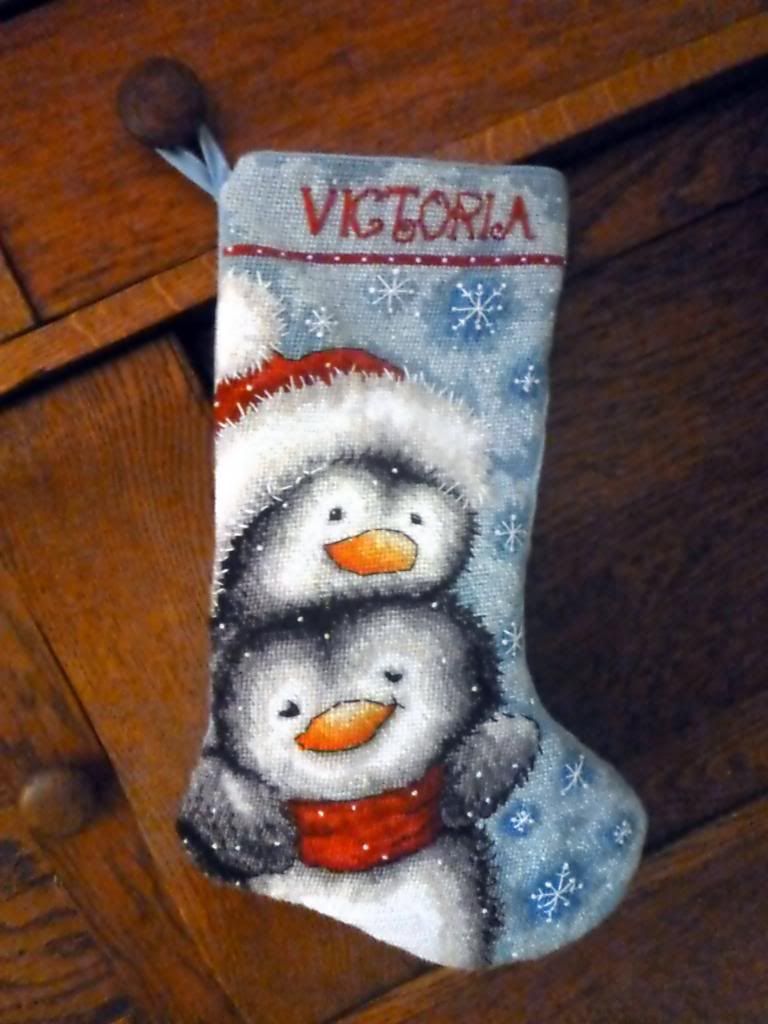
If you've been around my blog for awhile, then you may remember my first stocking. It was a needlepoint kit I made for my step-daughter. I finished it up last year, just before Christmas, even though I had a newborn (but it really helped that it was 90% done from the year before).


P1000477_zpsee7d46a3

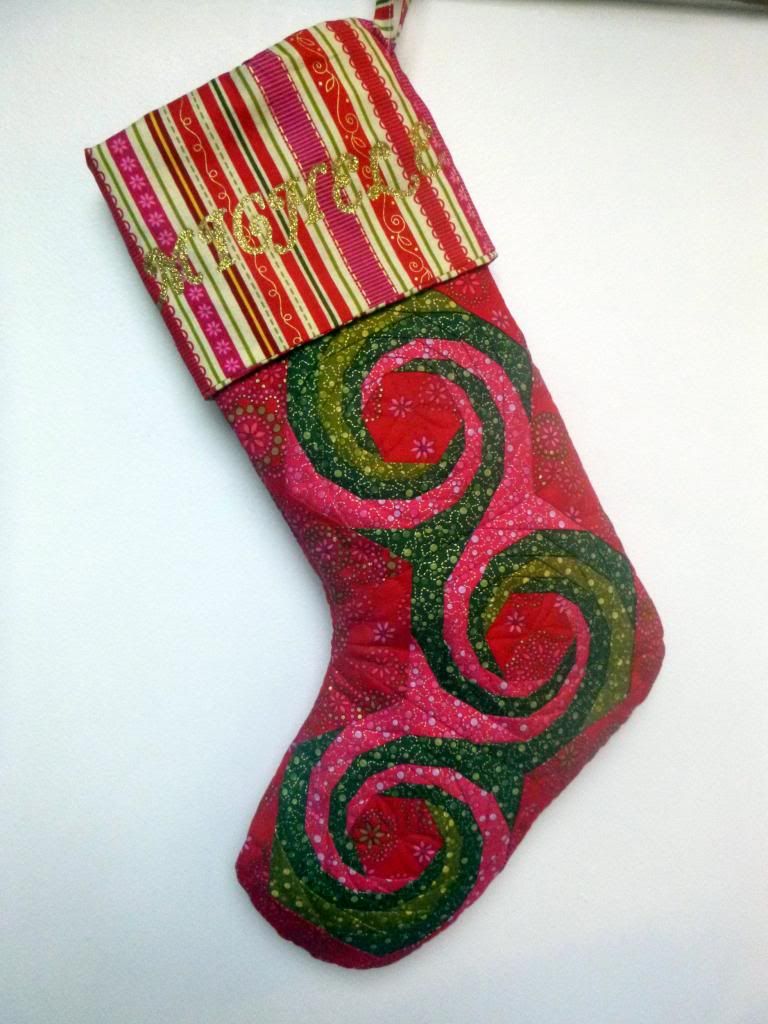
I bring up that stocking because Quilting Lines is hosting a Christmas Stocking Hang Out and because I made another one! No needlepoint this time..I might have been serious when I said never again! 


P1000478_zps11d2a7e6

A couple years ago, my mother-in-law ordered a kit for this paper pieced stocking from a magazine..only, she had no idea how to paper piece. She tried, but this pattern is not anywhere one should start out piecing! 

Some time later she sent it to me, at a point when I also had no idea how to make it. I put it in a drawer, but it has been in the back of my mind, especially since I learned how to paper piece this year. I decided to pull it out and make it for her this Christmas. I knew she would love it, as she bought it for herself, and I thought it would mean more to her than one to match the rest of ours. 


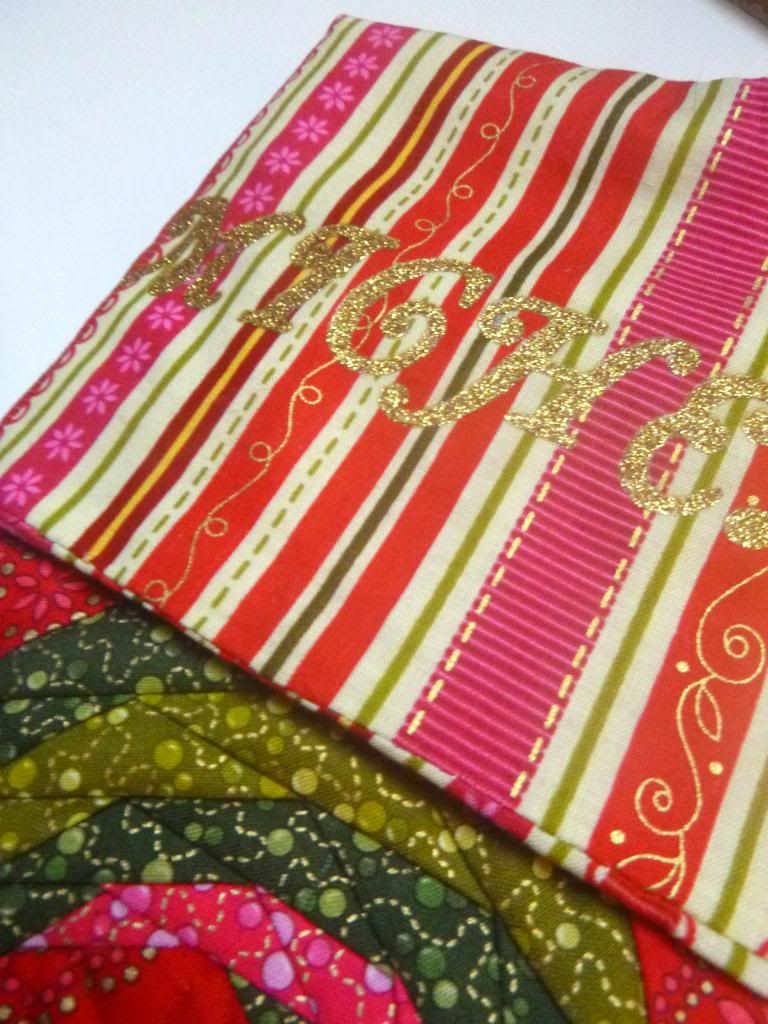
P1000480_zps5f3e2058

I had plans to applique a simple monogram on the cuff, but as I am still without the laptop I would normally use to print and transfer one, iron-on letters seemed a much better option. I chose these gold glittery ones to match the little specks of gold in the kit fabrics. I hope it will be a hit on Christmas! 

Monday, December 10, 2012

Pillow with Paper Pieced Mater


I was able to add some borders to my Mater block, quilt it and put it together! It feels so good to have this Christmas present finished up! And look, free motion quilting! It's not great, but I'm proud of myself for actually attempting it, after all, that's the only way to get comfortable! 


I fussy cut scenes from the backing print for the corner blocks on the front. I think it turned out really well, especially considering that I forgot to lower the feed dogs while I was quilting! Now just to wait and see how it is received by my nephew! 

In other news, I am trying to learn how to draft paper pieced patterns, because my son has asked for something I can't find (he threw a big wrench in my plans, as suddenly the LEGO guy is not good enough). I'm not good at it so far. I improve a bit every time, but the first one I tried to do had about 179 pieces! Mater up there had less than 20...

I'm thinking I'll be doing applique for his pillow!

Thursday, December 6, 2012

Mater Made

Look what I finished last night?! He is so stinking cute! 

Made from a free pattern by liljabs.

I will be turning this 10 1/2" block into an 18" pillow cover. I'm going to add some small borders, some fussy cut scenes from the Route 66 fabric in the background here at the corners and use the rest of the fabric as backing for the pillow. I am thinking I should probably quilt it just a little too. Eek! I'm a bit afraid of ruining him, as I think he's pretty awesome right now! 

Friday, November 30, 2012

Holiday Lane Blog Hop

It's here! My day is finally here! I've been so excited watching the other hop participants reveal their pillows! I have to give a big thanks to Madame Samm and Pauline for hosting this huge gathering and cheering us all on!

So, without further ado, here is the back of my pillow!


I'm showing you the back first, because I fell in love with this fabric from Robert Kaufman's O' Tinsel Tree 2 line at a quilt show and immediately envisioned my Holiday Lane. I wanted those wonky doors and window panes, the cute snowman, the wreaths and lights and most importantly, the blues and grays! 


I think I was pretty successful at adapting it for Jill's pattern (which is free if you'd like to put together a Holiday Lane of your own!). 


Ready for some detail shots?


This fabric was supposed to be waves, but I had houses on my brain when I found it. I saw shingles!


I had these miniature buttons made for scrapbook pages in my stash and just had to add them to my snowman! 


It's simple, but my favorite house is this plain blue with the little Christmas tree in the window. I hand embroidered the tree next to it with a motif from my flange fabric using a split stitch. 


I substituted fleece for the wool the pattern called for and used my machine to blanket stitch it down. I absolutely love how this pattern lends itself to customization! I can't wait to see how the other ladies have personalized their pillows today! I just know you'll want to join me in visiting them!

28 Peppermint Grove-You are here!

I wanted to buy a little something to give away today, but I couldn't find the time! I thought maybe you wouldn't mind if I de-stashed a little? 


I'll give away this pretty mini-quilt and matching tote pattern I have been meaning to make for ages, along with this Clover Rose Maker in size small (I bought all three sizes and have only opened one...bad stasher!) and a little Christmas fabric surprise to one random person who comments letting me know about something they've been stashing for awhile! 

Giveaway is now closed!

Wednesday, November 21, 2012

Blog hop begins today & a sneak peek!

Today is the start of the Holiday Lane Blog Hop! I requested not to go today, as this is my first blog hop. I really wanted some time to see other posts to get an idea how to format mine. So, I was assigned the last day of the hop and thank goodness! I have two kids with fevers right now and I'm glad that I only have to find the time to write a couple paragraphs versus a whole post! 


Here's a sneak peek of what you will see on the 30th! I love him! I love the whole thing and I can't wait to show it off! 


Thursday, October 25, 2012

Work in progress: applique flowers


I finished the applique on the panel I'm adding to my zigzag table runner/topper. I really envisioned this as hand applique, but when it came down to it, raw edge was just quicker and I want this project finished and on my desk! 

I should have shortened the stitch on my machine for these, but failed to realize that before completely sewing one flower, and I didn't want them to look different, so there are a few wonky spots when you look real close like this. 

You probably won't see this project again until it's complete. I'm attempting to be more monogamous in my quilting (do you just love that term? I can't even tell you where I heard it, but it tickles me to no end!), I really like juggling six projects at once, but it can feel like I never finish anything when there is so much going on. So I'm trying very hard.

That being said, though, Halloween is in six days and my costume is not complete...no quilting for me until that is finished! Then, I will quilt my topper before doing any more work on the Holiday Lane pillow up in my sidebar. So hard! I have such a vision and I can't  wait to see it come together! 

Thursday, October 18, 2012

Zigzag table topper, almost finished!


On Monday I showed you a picture of a small stack of 4 1/2 inch squares on my sewing machine. Look at what I turned them into! 

This is going to be a topper for my sewing machine desk when it's done! I love how clean and modern it seems, even with all of the vintage looking fabrics I used! I really think this is going to inspire a lot of sewing projects having something I made, and love in my space. 

I have an idea of how I will be finishing it, but I need to work out a few specifics. Pictures of a completed topper soon! Along with pictures of the knife vest I made for my step-daughter Victoria's Halloween costume

Tuesday, October 16, 2012

Learning to stipple


I have been trying hard to learn the basics of free motion quilting. I am still very, very new at it, but after I finished up this latest practice sandwich I realized that, as flawed as it was, I'd actually  be able to live with it on a quilt. Not love it, but live with it, especially on a real project where I'd take the time to baste! 

I think that I might possibly be ready to attempt a stipple on a quilt. Preferably one that I'm giving away so I don't sit and obsess over the flaws! 

Thursday, September 20, 2012

Mini quilt top without borders

First off, how on Earth is it Thursday already? I swear that Monday was just yesterday! This school year just seems impossible to adjust to for me, anyone else? 


I finished sewing all of my mini quilt blocks together. I feel like there should be an exclamation point on the end of that sentence, but it's all wonky and I'm upset about it. I think I might be able to disguise the wonkiness with the borders, so I was not going to post any photos of it on the blog until those were on, but I have had trouble getting to the sewing machine this week. 

Literally. Gabe has staked a claim on my sewing space, as it is fully gated off from the baby. Seems my ideal sewing space is also the ideal place to build with LEGO. I will sometimes get a few minutes to myself to use the machine only to find him hunkered down in my chair, and little plastic men strewn all over the extension table. 

One of two things usually happens at that point. Either I work up the energy to fight with him over my space, kick him out and clean up just in time for the baby to wake up and my sewing time to dissipate, or I just decide it isn't worth wasting my few quiet moments on the fighting and the clean up and I find something else to do. If I'm honest, it's usually the latter. 

Monday, September 10, 2012

Monday Moments and challenge results

A week ago I entered the One Thing, One Week Challenge at Amy's Creative Side. My goal was to cut all of the fabric for the mini quilt pattern I bought at the AQS Show. I'm happy to say that not only did I get all of it cut, I actually sewed four blocks! 


I posted the two pumpkins earlier, but this is your first peek at the turkey and flying geese blocks. My turkey needs some trimming up. This pattern may have been a bit advanced for me, as that little birdie made me want to tear my hair out a few times! 

I'm excited to finish up sewing this, though! I probably would have had more done, but it is soccer season and after a year off, I am a soccer mom again. 


The first game was Saturday and it was light pink versus dark pink. So confusing! 


Caroline played with keys and sunglasses and crawled around the sidelines. She really has no idea what's going on, but was generally pretty well behaved except for the part where she smacked her head on our lawn chairs. Poor baby! 


Friday, September 7, 2012

Paper pieced pumpkin, part duex

I know that I said my goal for my mini quilt was to cut the pieces by Monday, however, when I cut them out I have a little panic attack that I might lose them and end up sewing them together. It's not a bad problem to have...


Today's block is a little baby pumpkin.


I think the big one is less than six inches, if that gives you any idea of scale. Something is up with the color on these, because in person those blues could not be more different. The big pumpkin is a dark greenish blue, and the smaller one is a bright true blue. There are two more blocks in this quilt with blue backgrounds, I think I'm going to break my rules and buy something so that they can match. Something between the green/true blue, but in a darker tone. I'm hoping that will unify everything, and also hoping my local quilt shop has something like that in stock! 

Wednesday, September 5, 2012

Paper pieced pumpkin block

As I mentioned in the tail end of my post the other day, I cannot get the mini quilt pattern I bought at the quilt show out of my head. I have been wanting to make one forever! 


I just happened to find the perfect backing (and probably border, I bought a half yard) fabric at my local quilt shop. Being that it is a mini quilt, I figured I had more than enough fabric left from the Bali Pop I made this quilt with to make the top. So I cut the pieces for the largest block and got sewing. It turns out, I read the cutting instructions very wrong, and I am amazed that this worked out, at all


I wish this piece were in that fabric. I cut all of the pieces out following a chart and not looking at the actual foundation, with the exception of this one spot, it actually turned out how I was imagining. Still, I'm sad that I didn't realize how that was going to look, not sad enough to change it or make another pumpkin, but sad. 


Monday, August 13, 2012

Quilt top with borders and a little bit of quilting!

Last Monday, I posted my goal for the One Thing, One Week Challenge at Amy's Creative Side was to at least put the borders on my quilt, but ideally, finish it in time to put it in my friend's charity auction. I got the borders on and proof is in this hilarious photo!


Of course, in taking this picture (that my son was totally trying to block me from, but instead got his photo taken as well, score 2 for Mom) I realized two things. One, that the small mistake I knew about and thought I could live with, I could not live with! Two, that the small mistake was not the only mistake. And if I was going to rip seams and re-sew, I may as well fix both of the mistakes and be completely happy with it. 


So that is what I did. Then I basted it, and started quilting, but it became apparent that in no way was I going to be able to finish it and eat, and shower and have clean clothes before the weekend. Oh well! At least I was able to donate my cute bunny to the charity auction! 


Monday, August 6, 2012

Almost finished quilt top

I said on Saturday that I may have a finished top by Sunday, and I did! Well, a top without borders anyway. 


My goal for the next week is to get the borders on and really, if I want the option to ship it off to the charity auction, it needs to be quilted as well. Just in time for me to set these goals, Amy's Creative Side is holding another One Thing, One Week Challenge. The prize up for grabs is a craft book that looks super cute! Head on over there and enter with me! 

Amy's Creative Side


Wednesday, August 1, 2012

Finishing a UFO


I made three quilt blocks last night, which is actually a lot bigger accomplishment than it sounds like with a crawling, standing, teething baby. 

The shape may be familiar to you. I am making a last ditch effort to finish this UFO. The previous blocks to this quilt were the third things I had ever pieced. I liked the looks of them in my photos, and every time I came across the pictures I would say, "Why haven't I finished that quilt?" Then I would go dig the blocks out and quickly realize that up close and in person, they were really lackluster. I was so frustrated with it, that I nearly sold all of my finished blocks in my garage sale last summer! 

My plan for finishing this UFO is to scrap the blocks I hate (and there are quite a few, my tastes have changed over the years), group the blocks I like according to value (the values just aren't playing off of each other the way I thought they would), make it a lap size and quilt it to call more attention to the muslin bits that make up the sawtooth stars. I'm also thinking of giving it a muslin border with small star blocks anchoring the corners. That way the star motif will be more noticeable too. 

If I hate it, well, then at least I have this monkey off my back and a charity auction I'm donating to in a couple weeks! 

Tuesday, May 22, 2012

I have been bitten

The paper piecing bug has bitten me hard! Now that I know I can do it, I find myself absentmindedly searching Flikr for New York Beauties


I'm sure I will tackle some, eventually. In the meantime, I had an idea for a mini involving my tea kettle and searched for a tea cup to make. I found this pattern and it was free! Score! 


I made tea cup number two. I liked it, and it was pretty easy, except that my little experience led me to follow the directions instead of doing what I thought was right..and then unpick some seams. If you want to attempt it, switch numbers 7 and 8. Other than that, no complaints. 


I think the size scales well with my kettle. Plus, I got to use some of the decorative stitches on my machine! Ideally I'd like to pair these two with some broken dishes and/or some Dresden plates. I think just the names of those blocks make them good matches for kitchenware. 

Monday, May 7, 2012

Three things...

I am joining the One Thing, One Week Challenge again over at Amy's Creative Side.

Amy's Creative Side

Up for grabs this week is thread and a whole stack of mini charm packs, so hopefully that will be enough motivation for me to complete my goal of finishing the quilting I am doing.

I took a small break from the quilt this weekend and kind of learned to paper piece. I wouldn't say I'm an expert or anything, but I definitely have some sort of comfort level with it, which is a lot more than I could say on Friday!


I used a pattern from During Quiet Time's Amy for this. I had been gushing over her paper pieced gardening patterns for awhile and she recommended this tea kettle as a good place to start. It wasn't near as fiddly as I thought it would be, but right now I am wasting a ton of fabric as I'm not really sure yet how to gauge things. That should come with practice, I think. Not bad for my first attempt, though. 

Now what do I turn it into? 

And last, but not least, did you get your National Scrapbooking Day freebies? Some are still available! I know I talk about scrapbooking a lot lately, but it's the only hobby I have that I can do one handed while nursing the baby. I made a page Saturday night from this kit (that was free on Saturday) for a special speed scrap on the My Memories Facebook page. There were a lot of rules to this one, but I stuck with it (and did not re-size my photos after I found out how many embellishments we had to add), and ended up winning a small prize for my page. 


I'm still working on a page to enter for the $100 prize. I will hopefully post that tomorrow!

Tuesday, April 24, 2012

Tedium


I have never spent so much time quilting in my life! I really wanted to somehow try to explain why I was still working on this project (and I am probably less than half finished), and decided that a picture is definitely worth a thousand words in this case. I took this photo in black and white, and very close up so that I can show what I'm working on without really giving too much away! 


So what is it? It's about a two inch wonky square, where none of the sides touch any other shape. It means I'm stopping the machine after every two inch (some are bigger, some are smaller) square to cut thread tails for burying later. Ugh! I LOVE the look of it so far, it is seriously wonderful in the scale of the whole quilt, but it also means that I am nowhere near done. Loads of handwork, loads of machine work..the top was simple to piece, so I guess this is my trade off. I am going to be so sad to send it away when it's done!