 Supplies needed
:
8 fat quarters (or equivalent) of coordinating fabrics
1 ½ yards of buckram
½ yard solid color cotton for strap and tabs
1 yard of fabric for bag lining
Four 1 ½-2 inch rings, D-rings or square rings
Batting (2 pieces roughly 16X24 inches)
1 yard fusible fleece
5 ½ X 15 inch piece of plastic canvas
Coordinating thread for quilting and straps
Optional:
1 fat quarter for contrast binding on bag
Begin with the 8 fat quarters. Iron and cut each of these fat quarters into at least three 3 ¼ inch strips. From there you will need to cut forty-eight 3 ¼ inch squares and sixteen 3 ¼ X 6 inch rectangles. (If you want it all equal that would be 2 rectangles and 6 squares from each, I did not do equal amounts from each fabric.) Remember if you are using directional prints to cut both horizontal and vertical rectangles so that you can vary your blocks later.

From here, divide all of your squares into pairs and sew with ¼ inch seam allowance. Remember, again, if you are using directional prints to place a few of them vertically in order to be able to vary your blocks later. Iron, pressing the seams toward the darker fabric.

Now sew a pair of squares to each of your rectangles again using a ¼ inch seam allowance (you will have 16 pairs left over,
these CANNOT be vertically oriented). Vary the placement of your squares on top, bottom, to the left and to the right of your rectangles. Press the seams toward the rectangles.
You should now have sixteen 6 inch square blocks and eight 3 ¼ X 6 inch pairs of squares. Trim any excess fabric. Arrange these to resemble the front and back of your bag. Place two blocks and one pair of squares into each row. Each piece of the bag will consist of four rows.

Once you have a design that appeals to you, begin sewing the blocks and pairs of squares together into your rows. Alternate pressing seams up and down in your rows. This will eliminate some, but not all bulk, as there are so many different seams in this project.
Sew your rows together to form the front and back pieces of the bag. Press seams to either side. You should end up with two panels, each 14 X 22 ½ inches. Lay batting on top of buckram and place your bag front panel on top of that. Pin in place and quilt starting near the center. I chose to outline quilt my purse, if you choose this method remember to quilt ½ inch around the outside edges to keep your stitching out of the seams when you sew your bag together.
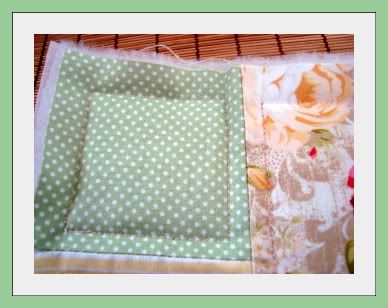
Repeat for the other panel. Trim the excess batting and buckram from both.
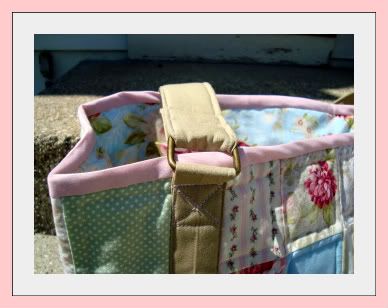
Cut four strips out of the strap fabric measuring 2 ½ X 16 ½ inches. (If you are using a thin, or light colored fabric you may need to use interfacing on this step to keep your background fabrics from showing through.) Press the strips in half, then open out. Fold each side toward the line you pressed in the middle to form the tabs for your purse. Loop the tab over the end of a ring and fold 2 ½ inches toward the back. Place the ring with the tab folded over it, as close as you can comfortably get to your presser foot ( ½ inch or more depending on the thickness of your ring). Sew a line along this point. Repeat for all four rings.
Center one of the tabs over the seam line between your first and second rows making sure that the top of the tab is flush with the top of the panel. Pin in place. Sew along each side close to the edge. When you get to the top, sew back over your line and reverse across the whole thing to reinforce. Reinforce the heck out of this thing, if your bag fails, this is the point where it will happen. Sew a one inch X with the top two corners meeting this line. Sew a line across the bottom corners of the X as well. Repeat at the opposite end of the bag, and for the second panel.
You are now ready to sew the outside of the bag together. With right sides together sew using a ¼ inch seam allowance around the left, right and bottom of the bag.
Start with one corner and fold the side seam down to meet the bottom seam. Sew a straight line across approximately 2 ½ inches from the corner measuring 5 ½ inches. (This should line up fairly neatly to cut off one square on each side.) Once your line is sewn, cut the corner off 1/4 inch from it. Repeat with the opposite corner.

Now cut two pieces of the lining fabric measuring 14 X 22 ½ inches.
Cut two pieces of the same fabric 8 X 16 inches. These will become your pockets. Fold ¼ of an inch in on each of the long sides of the pockets and press. Pick one side and turn under another ½ an inch, pressing again. Sew along this side 3/8 inch from the edge. Turn the remaining two sides in ¼ an inch and press. Fold in half or quarters (depending on how large you want your pockets and how many of them you want) and press for a really easy way to get stitching guides.

Place your pockets in the center of your panel two inches from the top. Pin in place along the sides, bottom and where you pressed your guidelines. Sew along the sides and bottom remembering to reinforce your stitching at both ends. Now sew along your pressed lines (again, reinforce your stitching at both ends). Repeat for the second pocket.
Sew the lining of the bag together using ¼ inch seam allowance remembering to leave the top open. Now square off the bottom corners in the same way you did the outside of the bag. (Sew a straight line across approximately 2 ½ inches from the corner measuring 5 ½ inches. Cut the corner off to 1/4 inch from your sewn line.)
Before you can put the lining inside the bag you need to sew your plastic canvas to the bottom of the outside of the bag to stabilize it. With the shell of the bag turned inside out center the plastic canvas on the bottom. Hand sew across both ends and at least one point in the center to secure the plastic canvas in place. Make sure that you are only stitching through the buckram and batting and not stitching through to the outside of your bag. Check this with every stitch. I used a very large needle and perle cotton for this. It will be inside the bag, this part does not have to be pretty, only functional. (You could also probably use cardboard for this step, but I have never in my life been able to find the cardboard that every purse pattern ever seems to call for. Plastic canvas is everywhere though, and as long as your bag isn’t thin cotton, it really isn’t noticeable.)
Turn the bag right side out and place the lining inside, wrong sides together. Pin or baste stitch the lining to the bag. Cut your 9th fat quarter into several 2 inch strips. Follow the directions
here to make them into one continuous strip for binding approximately 47 inches long. (You can cheat and use bias tape on this step, it actually works well. The big drawback to bias tape is that it comes in a very limited selection of colors. Should you want to go that route, use extra wide double fold tape and make the longer side your bottom piece.)
Fold your binding strip in half and press. Open out. Fold in ½ inch from the left end of your binding strip and press. Now fold the bottom half of the strip to the center line and press along the entire length. With the raw length of your binding strip flush with the top of your bag, line the folded end of your binding up so that it will fall behind one of the straps. Start sewing about 3 inches from your folded end 3/8 an inch from the edge. It is very important that you not sew the folded edge down yet.
Continue sewing around the bag until you get a few inches from the folded end of your binding strip, stop, lift the foot, but do not take the needle out of your bag. Slide the raw end of your binding inside the folded end. If necessary, trim the raw end of the binding strip so that it does not extend more than a couple inches past the folded end. Lower the foot and sew back to your starting point.

Fold your binding over the top of the bag and hand stitch to the lining.

Cut four strips of fabric 3 ¼ X 34 inches for your straps. Cut four strips of fusible fleece 1 ½ X 33 inches. Lay a strip of fabric out on your ironing board. Center the fusible fleece on top of it fusible side up ½ inch from each end. Fold the sides of your fabric strip up over the fleece and press according to the manufactures directions. You will have a small overlap, but that is necessary to keep your iron free of sticky fusible gunk. Fold the raw edges toward the side with the “seam” (fabric overlap) and pin in place. Repeat for all four strips.
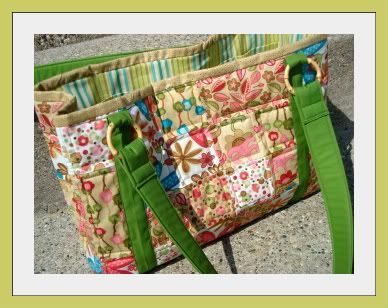
Pair up your strips “seamed” sides facing and sew 1/8 an inch around all edges. It is very important that your bobbin thread match your sewing thread as they will both be visible from this point forward. Beginning with the left ring on either the front or back, come from behind and loop your strap 2 inches over the ring. Re-sew along the edge and reverse over the entire thing to reinforce. Sew across again 5/8 inches from that line (toward your ring), reinforcing. Being careful not to twist your strap, come from behind and loop the opposite end of your strap over the right ring 2 inches. Sew in the same manner. Repeat for the opposite side of the bag.
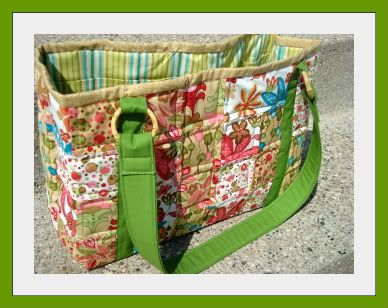
YOU’RE DONE!
This might seem like an awful lot of work, and it is, I won’t lie. It is very worth it though, I think. I will definitely be making more of them.
A note on the straps, because I’m sure someone will say/think it. There’s this thing called the safety pin trick that supposedly makes it all easy to turn straps inside out. In my experience it does not work well with anything that has any kind of thickness to it, but maybe you’re better than me. It seems easier, but if the safety pin fails you, you’ll be stuck turning out 68 inches of strap. Sixty-eight inches. Once, I got duped into the safety pin thing and ended up using a (insert your favorite expletive ending in “ing”) chopstick to turn out five feet of straps. Chopstick. Five feet. There’s my reasoning for doing things the way I do.
If you are better than me (or more brave) then you can cut two 3 ½ X 34 inch strips, line them with fusible fleece (of the same dimensions), turn them out and press. How the safety pin is supposed to help you turn out the straps is illustrated in steps 8-12 of
this tutorial. You would definitely have to turn the ends in and sew 1/8 inch from each end, but the sewing along the sides would be completely up to you, as it would serve no purpose other than decoration.
One more note, because there are a million one ways to change up or add to this bag, I really tried to keep these instructions mostly about what
I did. It was already a four page word document, so I didn't want to add more overwhelming information about what could be done.
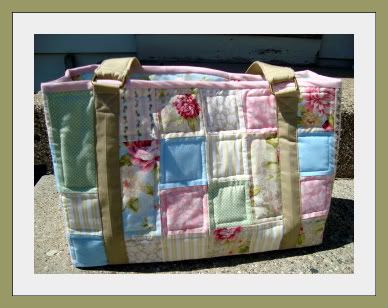
That being said, 8 fat quarters is easily enough to make the outside of two bags. I just like having the variety of prints. If you want to use less, all it will do is give your bag a more uniform look.