Monday, January 14, 2013

Monday Moments Scrapbook Edition

Are you getting tired of the scrapbook pages yet? I hope not! I still have several more to complete before I even start 2013 (and 2011?)! 

Last night was the Speed Scrap on My Memories Facebook page. When we were told to have three photos ready I quickly looked through the list of pages I wanted to complete and saw an event that I had three great photos for. 

Kit is called Falling for You, but I think it's retired...sorry! 
We've been searching for a new pumpkin patch since our old one went crazy raising their prices and started making us wait in 20 minute lines (always fun with kids)! Every year we have auditioned a new place, and I think we may have found a winner! The kids had so much fun playing with the pumpkin gun here! Gabe even shot it off a couple times before the noise bothered him too much...that boy doesn't even like the hand dryers in public restrooms, so that says a lot! I'll be turning this into a two page layout with the rest of the photos from that day.

Thursday, January 10, 2013

Two new scrapbook pages

In my last post, I listed the scrapbook pages I hope to complete for 2012, and to my surprise, there weren't many! I spent some time pinning page sketches and have decided to try and complete my entire book by the end of next month (I have a free photo book coupon that expires then)! Normally, sketches are where I turn when I'm just stuck about something, but I'm starting out with them now because I'm in a bit of a time crunch, but still want a customized look.

Sketch inspiration here, kit used is Flakes and Fun
Sketch inspiration here, free alphas here
I combined a few things and tried some new for Victoria's soccer page! The kit I used for this one is Hoo-Who Loves You and I think the colors and patterns are really great for tween and teen girls! However, owls were not what I was looking for on this page. I took a soccer ball from another kit and tried out the new recolor feature in My Memories. I think it turned out pretty good! Of course, I mentioned before that recoloring does mess with the shadows, so I had to create and shadow a second circle to place behind them, but I don't think you can tell! I'm so glad this feature is available now, otherwise I would have had to buy a whole new kit just to get a ball that wasn't orange! 

Tuesday, January 8, 2013

"Cover to Cover"..What I hope to accomplish

I have been hopping around the internet trying to access some of my scrapbook pages that I lost in my hard drive crash. As part of the "Cover to Cover" series My Memories is hosting, I had wanted to complete my 2012 book while working on a new book for 2013. I'm happy to say that I was able to retrieve a bunch of my work, and I'm feeling ambitious about maybe finishing 2011 as well! I wanted a go-to list of events I want to scrap so that when a challenge comes up, I'm not left flailing around wondering what I need to work on to meet my goal! 

2012
Kids playing in the snow
Nite Lites
Gabe sitting with Santa
Getting our tree
Caroline at Thanksgiving
Me and my sister
Gabe's birthday
Halloween
Caroline's 1st birthday
Pumpkin Gun/New Salem
Michigan's Adventure
Soccer
Circus
Duck Lake
Legoland/Rainforest Cafe/Field Museum
Photo shoot
Victoria's birthday
Easter
Circus
Gabe's Snowman

2011
Caroline's First Christmas
Santa Train
Getting our tree
Thanksgiving
Gabe's birthday
Halloween
Caroline coming home
Caroline's hospital pics
Caroline's first photo
Setting up the baby's room
Bowen's Mill
My birthday
Baby Showers
Beach
Ft. Wayne
Easter
Victoria's birthday
The ocean
Graduation
Monster Jam


Sunday, January 6, 2013

Scrapbooking Tips for Beginners and My Memories Tutorial

I recently posted a resolution to actually finish my scrapbooks so that I can get them printed, as my also recent hard drive crash made it apparent that printed books are far better than incomplete files on a computer! Coincidentally, My Memories has started a "Cover to Cover" project! Two pages per month and a complete book for 2013 by the end of the year. My plan is to work on 2012 and 2013 simultaneously and complete the book I was half done with when my computer crashed and a new book at the same time! 

My Memories has made a Facebook group for this project, and many of the people in it are completely intimidated by digi-scrapping, just starting out and not sure where to go! I wouldn't claim to be an expert, but I do remember being in that position, and I thought I'd take the opportunity to share where I started out! 

When you want to sew, you start with patterns, when you want to draw, start out tracing...when you want to scrapbook start with sketches or templates! It can take the pressure off of you for designing and really give you a chance to learn what you're doing, while pretty much guaranteeing you a great page! 


So, here is a fairly simple sketch for a page with one photo that I am going to be putting my spin on. Notice there is one photo, there are three flowers and four paper shapes, but only one has rounded corners. This is called the Rule of Odd. Not to say that great pages can't be made with even numbers, but it's definitely something to keep in mind if you feel like your pages are lacking, try taking away a flower, or changing one shape into another, or adding just one button. It could help! 

Normally, I would start with the furthest thing back on the page, but in this case, I'm going to start with the large, gray rectangle. It's touching everything and looks like a good piece to use to judge the positions in the rest of the layout. 


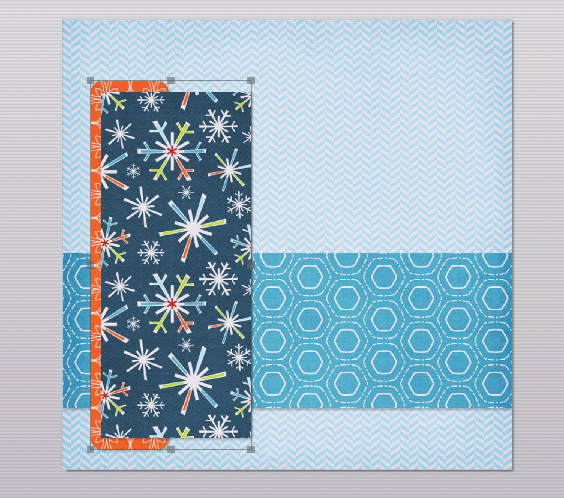
Choose a background, then using the shapes tap, add a rectangle. Enlarge it to the length of the layout and adjust the width before clicking to select your paper (or photo if you're using outside content). Your image may be distorted if you do it the other way. 


Next, you'll see I have added the strip with rounded corners. This shape is smaller, so you may want to double click on it once you have added your paper to zoom in and move the pattern around. I like to shadow as I go along, but some people prefer to do it later, and some don't like to use them at all. It's just a matter of preference. To add a shadow, click on your shape to select it, then click the shadow box in the upper right of your shapes tab. From there you can adjust where the shadow sits, how intense it is, and the amount of blur. 
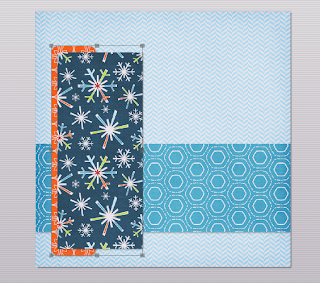


In this photo, I have added the second large rectangle to the layout, shadowed and filled it with paper. Now I am going to group them together and send them to the back of the layout, behind the largest rectangle to match the sketch. To group them, first click on one, then hold your control key while clicking your second. Right click (or use the arrange tab at the top) to select arrange and group. Once they are grouped, right click again and select "send to back" to position them directly on top of your background paper. 


Now we're going to add our last shape to the page. Use your other shapes as a guide to position this final rectangle.  


Here, I decided I didn't like the look of that solid blue. To change the paper in your shapes, simply click on it and select the paper or photo tab again and select a new image. This can be done at any point in your layout, so don't be afraid to try something! 

The next step shown in the above photo is adding a photo box. I prefer to adjust the box to the size that will fit my layout and then double click to add my image. That way, I know that it fits and I don't need to guess with cropping. 


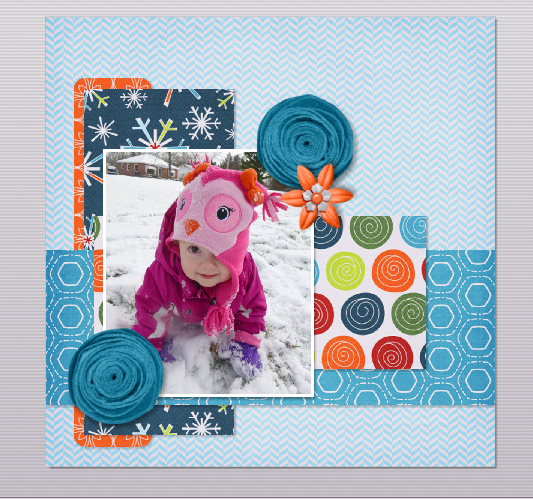
Now, the page is really starting to come together! I selected a photo of my daughter and added three flowers found in the embellishments tab. When using two identical embellishments as I did in this page, I like to either mirror or rotate one so that, at first glance, they don't appear to be the exact same thing. 


At this point, I have decided to add my title. I find the grid (the graph paper looking icon along the top) to be really useful when lining up monograms or alphas. I chose to align my letters along the uncluttered area at the top of my page where it is easier to see. There is a function in My Memories called "snap to grid" that a lot of scrappers use to align their letters, but I prefer to manually place mine. Try it and see which way you like! 


Here, I selected all of my letters and grouped them together. I scaled them down (while grouped, so that they all remain in the same proportions) and moved them to the bottom right of the layout in a slightly different position from the one in the sketch.  

You may also notice that I changed the position of the dotted paper again. That one circle of really bright green was too distracting for me. If something stands out too much you have two choices, remove it, or add more of it! Double clicking on the shape and moving my image allowed me to have three bright green circles in my layout, and now it isn't taking away focus from my photo! 

Kit used is Bella Gypsy's Be Merry
To finish, I added two small text boxes. One for a short bit of journaling, and the other for the look of a handwritten date in the bottom corner. 

If you have any questions, feel free to leave them in the comments and as long as you are not a "no reply" blogger, or as long as you leave your email, I will respond to you directly and try to help! 

Monday, December 31, 2012

Happy New Year!

I hope you all have been enjoying the holiday season! I had a wonderful Christmas that was soon overshadowed by the loss of my husband's uncle. Two short weeks after he was told he would live at least six...2013 will be a tough year for many in our extended family.

It seems silly to write that and then talk about crafts, but it is the new year and I have a little tradition of posting craft resolutions here on the blog.

Last year, I wanted to blog more (done, barely), finish the top of my basket quilt (nowhere near done), buy less fabric (definitely), and try new things. I have been working on my free motion quilting skills, paper piecing, and tried hand applique once. I feel like I have really grown a lot as a quilter this year, but at the same time I feel like a novice.


For 2013 my goals are: 
1. Use more of my stash. Funny how I bought less fabric and made a few projects completely out of stash fabrics, yet my stash is still intimidating me! 

2. Make something for my son. Gabe is always getting the short end of the stick on craft projects because he can never seem to make up his mind on what he wants and I'm afraid to start sewing only to have him decide he wants something else.

3. Make a version of this banner quilt. I have been thinking about this one for awhile and I know it's something I need to do for myself. 

4. I would also like to finish and get printed my scrapbooks for 2011, 2012 and Caroline's first year. Of course, I need a working computer for that, and my laptop is still out of commission, but my hard drive failing has really made me aware of how important printed copies of my work are! 

5. I nearly forgot my goal to be more monogamous in my quilting. I want to have a lot fewer works in progress and a lot more finished projects next year! 

What about you? 

Friday, December 21, 2012

Christmas Stockings

If you've been around my blog for awhile, then you may remember my first stocking. It was a needlepoint kit I made for my step-daughter. I finished it up last year, just before Christmas, even though I had a newborn (but it really helped that it was 90% done from the year before).


P1000477_zpsee7d46a3

I bring up that stocking because Quilting Lines is hosting a Christmas Stocking Hang Out and because I made another one! No needlepoint this time..I might have been serious when I said never again! 


P1000478_zps11d2a7e6

A couple years ago, my mother-in-law ordered a kit for this paper pieced stocking from a magazine..only, she had no idea how to paper piece. She tried, but this pattern is not anywhere one should start out piecing! 

Some time later she sent it to me, at a point when I also had no idea how to make it. I put it in a drawer, but it has been in the back of my mind, especially since I learned how to paper piece this year. I decided to pull it out and make it for her this Christmas. I knew she would love it, as she bought it for herself, and I thought it would mean more to her than one to match the rest of ours. 


P1000480_zps5f3e2058

I had plans to applique a simple monogram on the cuff, but as I am still without the laptop I would normally use to print and transfer one, iron-on letters seemed a much better option. I chose these gold glittery ones to match the little specks of gold in the kit fabrics. I hope it will be a hit on Christmas! 

Monday, December 17, 2012

My Memories Version 4 Winner!

Have I mentioned that my laptop is in the shop yet? Ugh! So I drew a winner for my giveaway using random.org, but if there is a way to copy and paste images on the Kindle, I'm not familiar with it. I hate that I have to say, "Trust me, it was 3!" But, um, trust me, it was 3! Congrats to CricutLuvr, I will be emailing you! 

And for those of you who didn't write comment number 3, you still have chances to win at Sew Cal Gal, Missy's Scrap Space, Digital Scrapbooking, Stuff- n- Such, Two Girls at Play, and Dear Creatives. Or you could skip the wait and use my code in the sidebar to buy your own for $10 off! Either way.