Wednesday, July 29, 2009

Simple and sweet


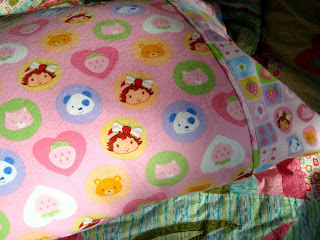
It's kind of cool how some nicely coordinated fabric makes something as simple as a pillowcase look like work. These are for my niece. Another piece to the birthday gift. A piece that I nearly left off and saved for Christmas with all of the baby shower stuff I have crowding my brain right now. She is being transitioned into a twin sized bed to make room for her new baby brother, though. So I decided it was an important thing to get done now.


I took the directional print into account when I asked for 3/4 of a yard of the small Strawberry Shortcake pattern. I went all brain dead when I bought the larger print though and ended up with not enough to make the pillowcase the way I wanted to. The picture on the top is how I wanted both sides of the pillowcase to look.


Once I realized my mistake though, I decided to make the best out of what I had instead of making a last minute run to the fabric shop. Now she has two different looks on the same pillowcase, my husband thinks it's better this way. I'm not sure, but I wasn't worried about it enough to go purchase another 3/4 of a yard of fabric.

Monday, July 27, 2009

Monday Moments

Yesterday was a kind of gray, windy day here, so we thought we'd head out to Lake Michigan and break in the new kite my step-daughter had gotten for Easter. We got there and it was no longer gray, but at least the wind held up...and made the water way too rough for swimming so I didn't feel guilty for putting the kids in jeans.


My son was fascinated. He kept looking up and pointing and repeating, "kite, kite," a word that had never entered his vocabulary before yesterday.


It wasn't too long before he was running up to us and using the sign he invented for "have". His little hand was waving back and forth frantically asking us to turn over the kite string. We let him take it, but we held on to a little bit so that he didn't lose his sister's kite. It is amazing how much he is learning lately and how quickly he picks up words from us.

Tuesday, July 21, 2009

From Birdhouse to...


Doghouse! I can't believe with all of my dog related posts lately that no one saw these coming. Though I did enjoy the ideas about what I was going to do with the birdhouses, especially the comment about how I should definitely think before I put them in my sewing machine. Ha!


I made these to use as table decorations for the baby shower I'm throwing next month. I knew I wanted something else to add to the theme, and when I saw the birdhouses I knew right away that they were it.


Aren't they cute? I'm really pleased with how they turned out. Nearly exactly what I pictured in my head.

Monday, July 20, 2009

Monday Moments

This morning I sat down at the computer to go through our photos from the last week and pick out a moment for today's blog post. I found nothing but pictures of completed crafts and all of the dirt my husband found under our hood from last week's adventures.

I briefly thought about just posting a second picture from our weekend at the cabin, but decided that wasn't really fair. Not to mention that no photos meant my adorable little boy hadn't been outside to play for any decent period of time recently.


So we packed up some water, the bug spray and the stroller and headed to some nearby hiking trails. There were a million wildflowers in bloom. It smelled gorgeous!


A nice walk turned out to be the perfect activity for the day. Moment achieved.

Sunday, July 19, 2009

Take a guess


I am currently working on an idea involving these two bird houses. I was hoping to have it done and posted today, but I hit a small bump along the way and it just isn't ready.

So, I thought I'd give you all a couple days to try to figure out what I might be doing with them. Any guesses?

Wednesday, July 15, 2009

Hot Dog


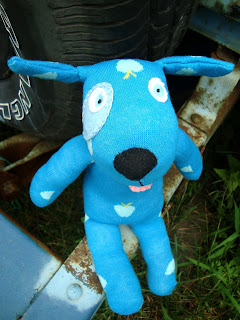
Here is the first of three sock dogs I have plans to make. I finished most of him at my mother-in-law's cabin over the weekend. I didn't bring everything I wanted in my sewing bag. It was hard to know what to pack and how he might take shape.


So yesterday I added a furry pink little tongue and sewed a collar. I might add a dog tag as well. I have decided his name is Apples and I think that would be cute on a little dog bone shaped "charm" hanging from his collar.

Monday, July 13, 2009

Monday Moments

Whew! I'm home from my long weekend, and though it was so much fun and less of a challenge than I ever would have imagined to go without the TV or computer (or cell phone!) I am glad to be back with all of the comforts of city living.


However, there are some things the city just does not offer. I mean, sure, the occasional deer on the freeway practically puts me into cardiac arrest, but this doe was just gorgeous. It was probably close to 90 degrees that day and she walked out into a mucky stream to have a drink and cool herself off.

We were enjoying an off-road adventure with another couple (the closest my husband and I have come to a date in a year), showing them fun things to do with their new truck. We drove across a short bridge and there she was. I yelled at my husband to stop so I could take her picture. She was kind of stuck there posing for me as she made her way out of the water the only way she could...slowly.


Seeing a deer in the middle of the woods is not too spectacular. The one who came crashing through my mother-in-law's backyard as we were gathered around the campfire roasting marshmallows...that one really made me long for a more secluded place.

Saturday, July 11, 2009

Meow!


The Pussycat half of Melly & Me's Owl and Pussycat duo is finished.


Construction wise she was much easier than her counterpart. I think she turned out really cute, but I wish I would have used a different color of embroidery floss for the nose, mouth, and whiskers. Things to keep in mind next time.


And finally, I'll include this picture of the lining, just for my friend Erin. She occasionally sends me fabric scraps from her stash and I used two of her fabrics on this project. I know she loves seeing it put to good use.


Now for the "bad" news. This will be my last post until my Monday Moment, and Monday's post won't happen until late in the evening. (Anyone else singing Paul Simon now?) We are going to my mother-in-law's cabin for the weekend. No cable, no computer and barely any cell phone service. I plan on bringing a lot of little hand sewing projects to occupy me while grandma occupies the kids.

Wednesday, July 8, 2009

I'm being crafty, I swear.


I just finished up this adorable baby shower thing. I want to show you all, but my sister regularly reads this blog and I want this to be a surprise. I am really happy with how it turned out, and I hope she will be too.

Monday, July 6, 2009

Monday Moments


Another Monday already. This week's moment actually includes me! Not wearing makeup or anything. The picture was taken by my step-daughter, which is why I only have half a head. We all took a walk down the street to one of our local churches and staked out a little piece of their lawn to view the fireworks. It's a nice relaxing place where a lot of families gather, but it doesn't have the best view. I think next year we're going to have to find a new spot, on a hill somewhere.


It seems that a lot of local folks know that families like the church lawn, and that the church lawn has a giant tree right in the way. No less than two houses shot a bunch of fireworks up into the air. They really tried, and somewhat succeeded to rival the city. I decided to test out the fireworks mode on the camera. This is something one of those generous people set off for our viewing pleasure. Thanks, neighbor! Whoever you are.

Saturday, July 4, 2009

You know what this means?


It means I can start on the Pussycat purse. I'm so paranoid that I am going to mess something up that I won't allow myself to actually cut the pieces for the purses from the fabric until the dress is completely sewn. Clothes are hard, m'kay?


Well, harder than purses, anyway. I think I might like this one better than the birds. Maybe. Obviously since I picked out the fabric and, in the words of Spongebob's grandma, put love in every stitch, I'm kind of partial to them both.

Wednesday, July 1, 2009

Doggone cute key chain tutorial


Does everyone out there in Bloggyland know that I am going to be an aunt again? I am, and I am once again in charge of the baby shower.

My sister is having a boy, and picked out the cutest little puppy invitations for the shower. We're going to build an entire theme around them. Which is where these key chains come in. I whipped this little dog up in just an hour or so today. I thought it would make an adorable baby shower favor, while also promoting my work and costing just a few cents each. Could there be a more perfect favor?

Want to make some of your own?

You'll need:

key rings
felt
embroidery floss
fabric scraps
ribbon
fusible web
fusible interfacing

Odds are if you sew you have most of these supplies already, and it only takes a very small amount of each!

Step 1:

Make a sketch of your key chain.


Step 2:

Trace your sketch, breaking it down into parts. Cut these pieces out.


Step 3:

Lay your pieces face DOWN (or else you'll create a mirror image of your sketch) onto your fusible web and trace around them with a pencil. Loosely cut out around your shapes.


Step 4:

Iron the pieces you cut out of fusible web onto the wrong side of the fabric scrap you have chosen as the color for each piece. Do NOT use steam for this part. You will ruin it. When the pieces have cooled, cut them out on your pencil lines and remove the paper backing.


Step 5:

Chose the fabric you want to back your whole keychain and fuse interfacing to the wrong side. With your iron on steam, begin adding your web backed fabric pieces to the front of the keychain one by one.


Step 6:

Embroider any small features. (You could also use fabric marker or fabric paint for this step.)


Optional Step 7:

Machine or handsew around your fused pieces to make your design last longer. (Not a necessity for keychains, as no one really expects them to last forever.) Add any beads, buttons or embellishments after this step.

Step 8:

Place a piece of felt underneath your keychain, cut loosely around your design, simultaneously cutting a piece of felt the exact shape to back your keychain.


Cut a piece of ribbon about four inches in length. Loop one end over a key ring and sew to the inside of your felt backing.


Step 9:

Place the back and front of your keychain together and blanket stitch around the outside edge.


Not too difficult and totally cute!