Wednesday, May 26, 2010

Down a pound!

I started this blog because I had a dozen or so people after me for a place they could see everything I make. How shocked am I a year and a half (or so) later that my posts that get the most views are about my life and my family.

I'm taking that as a little bit of a hint, though the main focus of this blog will still be what I make, I've decided to let you all in on a little more of my personal journey. Starting today I'm going to be posting a weigh in every Wednesday. I won't post my actual weight (yikes! Big, big kudos to those of you who can man up to that!), but I plan to post plus or minus pounds.

I started an exercise plan a little over a week ago. I figured first things first. I am not currently dieting, but I have read many places about how much you want to watch what you eat once you realize how hard you have to work to take it off. So far, that is slightly true. I am definitely more aware and second guessing myself when I eat something unhealthy.

I have already seen vast improvements in what I am capable of, and shockingly enough I have more energy when I spend 30+ minutes sweating my buns off. I figured that out when fairly early into my plan I decided to skip a day and nurse my sore muscles. I was amazed at how terrible I felt all day. Worse than I had any day that I worked out.

Ironically I skipped today too, but only because I got sick. Nausea and bending and lifting and jumping around do not go well together. But I plan on getting right back on the horse tomorrow, and I have 72 people here to hold me to it. One pound down, 55 more to go!

Tuesday, May 25, 2010

Loving this...

I am still hard at work on the benefit quilts and a rattle pattern to go along with them, but I saw something yesterday that just tickled me to no end.

Remember way back in October when I blogged about some owl cake pops I had made, and how I was going to write to Bakerella about them? Here's a pic to refresh you on these.


Well, when I e-mailed her back in October she very kindly wrote back to me that my idea wasn't quite original, she had made some owl pops of her own, very similar to mine, but with candy necklace pieces for the eyes. I sat there wondering how I had missed those on her site, and knowing that must have been where my inspiration came from, even if I didn't remember seeing them.

Yesterday she made the big announcement on her blog that her book about cake pops finally had a release date. She linked to some sites where you can buy it and see the official cover art. This is the part that tickled me. Go look. "My" owls are in the bottom left corner. The ones she and I e-mailed about way back in October, when no one knew she was writing a book. When the photos and ideas were top secret. I feel sort of vindicated. I knew I was creative, but it's nice to know that sometimes I am as creative as the folks who are getting paid to be.

Monday, May 24, 2010

Monday Moments


Yesterday we took Gabe outside to play. Even in the late morning hours of the day it was already hotter than it had been...all year. We just weren't prepared for this dramatic temperature change. I watched him use his sunglasses to push all of his gorgeous hair up out of his face and knew it was time to get rid of it.

This was by no means his first haircut, but he's had the same hair cut for more than a year now (with the exception of that one time the hairdresser had no idea what I was describing, even though she said she did and I left my husband to supervise the cut). I love his hair long. I love how baby soft it is, while still being thick like mine. It lays perfectly with that old cut, but I just couldn't let my little boy suffer through 90 degree weather with that mop.


Besides, it will grow back, or at least that's what my husband keeps saying to console me. And he's still cute.

Wednesday, May 19, 2010

Charitable preview


I thought I'd share a little peek at what I have been working on, and a bit of information on what they're for.


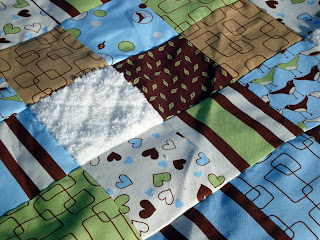
These are the main parts of some small stroller/tummy time sized baby blankets. I needed something little, easy to complete, yet still irresistibly adorable because I want people to pay a lot of money for them.

Over spring break we got an e-mail from my husband's cousin asking us to join a group on Facebook called Get Well Luke. The e-mail had said something about Luke having cancer, and try as he might, my husband couldn't think of a single Luke that he and his cousin both knew. That was because my husband couldn't fathom that the person was a 15 year old family member. We sat in stunned silence when we got to the page full of well wishing from high school kids.

Luke has lymphoma. He is undergoing treatment for at least four tumors, and if the medical bills weren't crippling enough, his family lost an income when his mom had to sit by his hospital bed for weeks at a time. The family is holding a benefit in Kalamazoo, MI on June 5. There will be a dinner, a raffle and a silent auction, which is where I'll be placing these blankets (hopefully along with a matching rattle if I can figure out a pattern) when they're finished.

Tuesday, May 18, 2010

Heads Up!

There are some major giveaways going on out there in craft blog land this week! I stumbled upon a few today that might interest you.

First off, my favorite and the one I hesitate to share, but sharing earns me another entry to this sweet giveaway! Sew Take a Hike along with Superbuzzy is giving away a $60 gift certificate to one winner for Superbuzzy's store. Never heard of it? Picture the cutest, kitschy-est Japanese imports ever, and you still might not get cute or kitschy enough.

Next we have Sew Cal Gal giving away three different assortments of Hawaiian quilting fabrics, books and patterns. Have you been reading this blog long enough to see the shirts my husband wears? I want to win one of these packages badly!

And finally there is Sheree's Alchemy. Sheree makes adorable clothing for kids and is giving away scraps from her latest projects. Some of them as big as 1/2 yard! She has great taste in fabrics and these scraps are definitely desirable!

Some of these lovely ladies even link to more giveaways hosted on other crafty blogs, so be sure to poke around a bit. Hurry, giveaways end 5/23, 5/31 and 5/21 respectively!

Monday, May 17, 2010

Monday Moments


We took the kids to Dog 'n' Suds in Muskegon this weekend. A local legend in root beer (and hot dogs). It has car hop service like Sonic, but the difference is Dog 'n' Suds has actually been around since car hops were the norm. It was founded in 1963 and looks like it came right out of the late 50's. Yellow checkered floors, black checkered floors in the booths with red vinyl seats, neon signage and a jukebox that was sadly out of order Sunday.


Of course, atmosphere isn't the real draw of the place, though it certainly has plenty. The real draw is the frozen mugs of Dog 'n' Suds brand root beer. It is so delicious and creamy that we couldn't even deny the two year old his own glass. It took a lot of work for him to get a drink down, but once he did he let out a huge, "Ahhhh!" We also let him try his first ever corn dog. The verdict on that was a resounding thumbs up too.

Wednesday, May 12, 2010

Monday Moments

I'm crazy late with my Monday Moment this week. I drove a few hours to see my mom on Mother's Day for the second year in a row, then I spent the night and drove a few hours home. It made for one exhausted mommy with one equally exhausted two year old.


This is my niece and my son from this weekend. They are crazy cute kids and exactly as far apart in age as my sister and I are. It's pretty fun watching them interact and knowing that it's probably very similar to the interaction we had as children. If one is on my lap, the other has to be. If one is eating cereal, the other has to be, even if the other had three hot dogs for dinner and no business being hungry before bed.

They go into a bedroom to play and make up elaborate stories about how there are ghosts. Ghosts that are haunting a plastic roast chicken that came with the play oven, and can be scared away by a flashlight, but only if a grown up is holding it. Ghosts that used to be haunting my six month old nephew's crib until they figured out they were getting in trouble for climbing on it.


And, oh, the baby! I only saw him three weeks ago, but he's so much bigger and beginning to show serious signs of mobility. My niece is obviously used to having him around. My son is very not. Three weeks ago he wasn't bothered in the least by his cousin, but this weekend was a different story. I held him in my lap on the living room floor and Gabe came barreling up to sit on my other knee. He looked me deep in the eyes and gave me a very quaky, "No, Mommy." A short while later I was holding the baby sitting on a bar stool near the kitchen counter when he wanted to share my lap again. That time there was no way to physically lift him up there with the one arm I had free. I told him that I couldn't hold him and the baby. He offered me a very simple solution. "Mommy, put baby down!"

Monday, May 3, 2010

Quilted silhouettes tutorial


Here it finally is, the Mother's Day (or any day) gift tutorial. You know you want to make one for your mom or yourself!

You'll need a...

5X7 profile head shot of your child
1/2 yard of two color print
1/4 yard of coordinating dark solid
scrap of coordinating light solid (approx. 8X10)
scrap piece of quilt batting (approx 12X14)
coordinating thread
fusible web (such as Pellon Wonder Under or Heat n Bond Lite)
6 ft of 1 1/2" ribbon
optional lightweight fusible interfacing

Ready to get started?


Cut your child out of the photo.


Clean up any stray hairs, cut details (like long hair) and remove most of the chest and shoulder area. It may help to do an image search for silhouettes to get an idea of how you'd like to shape yours.

Before we move on we're going to need a template for an oval. If you don't already have one you can make one really easily in Microsoft Word. Just open it up and insert an oval auto-shape. Enlarge it until it is almost the size of the page (check print preview if needed) and print.


Make sure your silhouette template fits inside your oval. If not, go back and enlarge it until you have something like the photo above.


Lay your cut out photo on top of the paper side of your fusible web the opposite way you want it facing in the final product and trace around it. Cut the fusible web, making sure to leave a border around your traced line. Using the directions on your package iron the fusible web to the back side of your dark fabric. Once it has cooled cut out along your pencil lines.

Repeat the process with your oval template on your light fabric. I added an extra layer of regular fusible interfacing on this step, trying to stop the backing fabric from showing through, but it still did. I'm not sure it made much difference, so I'm putting it as optional. If you do decide to use the fusible interfacing make sure you iron it on BEFORE ironing on the fusible web.


Now cut a 10 inch by 12 inch piece from your two color background print. Peel off the paper backing and center your oval on this piece (approximately 1 3/4 inches from the top and bottom and 2 inches from each side, depending on the size of your oval). Adhere the oval following the directions on the package. Peel the paper backing off of your silhouette and iron it in place inside the oval.


Using coordinating thread zig zag stitch around the oval and straight stitch around the silhouette. (This can get tedious, if you'd prefer not to sew in such detail there is fusible webbing available that doesn't need to be sewn in place.)

Cut another piece from your background fabric 12 by 14 inches. Layer this under your top piece with your quilt batting in between, pin in place. Quilt by stitching around the outside edge of the oval, then trim down to the size of the top.


Cut your ribbon into 36 inch pieces. Pin in place 1 1/2 inches from each edge along the top. Fold up the remaining ribbon and pin it to make sure it stays out of your seams when you bind the wall hanging. Stitch along the top, near the edge to help keep the ribbon straight.


Now take the remainder of your dark fabric and cut 2 inch strips that total approximately 50 inches in length. Lay your strips perpendicular to each other and sew from the top right corner to the bottom left to piece your strips together.


When you fold it over it makes a pretty little bias seam like this. Continue piecing together your strips in this manner.


When you are finished, trim the excess and press the seams open to reduce bulk.


Now press your completed binding strip in half lengthwise keeping your seams on the inside. Press the bottom half only toward the center crease in your strip. Once you are finished fold 1/2 inch on the left end. This will become the casing for the raw end of your binding strip.


Line up the raw edge of your binding strip with the raw edge of your wall hanging starting at least two inches from any one side. Start sewing about two inches from the folded end using a 1/2 inch seam allowance.


Stop sewing 1/2 inch from the corner and fold the binding strip so that the raw edges are flush along the next side. Sew to 1/2 inch from the next corner. Repeat the technique until about two inches from your folded edge.


Stop here and place the raw end of your binding strip inside the other piece. Now continue sewing until you meet your starting point. Flip to the back side and hand stitch in place.

Take the pins out of your ribbon and tie a bow. Cut the ends in a V shape and you're all set to hang on the wall!


Gorgeous!